|
Size: 1482
Comment:
|
Size: 1512
Comment:
|
| Deletions are marked like this. | Additions are marked like this. |
| Line 9: | Line 9: |
| As "Username" enter: {{{ | In the "Username" field of the above dialog enter: {{{ |
How to configure a wireless (WLAN) connection for 802.1x authorization
- Click on the network-settings symbol on the task bar of the Ubuntu desktop.
- In the upcoming menu click 'edit connections'.
In Tab:Wireless choose the name of your current wireless connection and click button 'edit'.
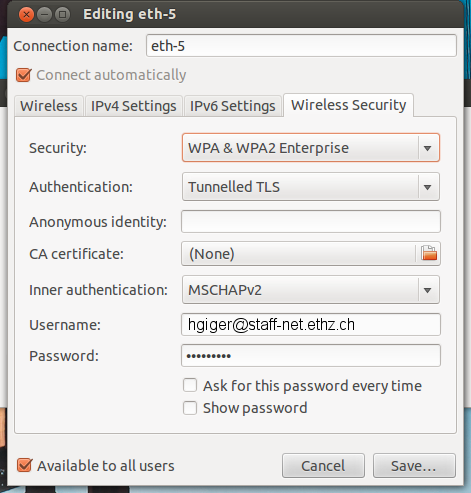
- In the upcoming window click Tab:'Wireless Security', make the following settings and enter your NETHZ name and password:
In the "Username" field of the above dialog enter: {{{
<username>@student-net.ethz.ch, if your are student at ETH
<username>@staff-net.ethz.ch, if your are a staff member of ETH
<username>@guest-net.ethz.ch, if your are a guest at ETH

As password, enter your ETH network password- Click 'Save...'. In the upcoming "No Certificate Authority..." window click button 'Ignore'.
- Click button 'close'
How to configure a wired connection for 802.1x authorization
- Click on the network-settings symbol on the task bar of the Ubuntu desktop.
- In the upcoming menu click 'edit connections'.
In Tab:Wired choose your network profile and click button 'edit'.
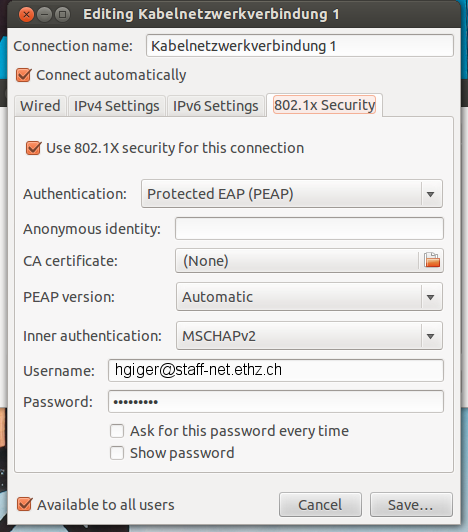
- In the upcoming window click Tab:'802.1x Security', make the following settings and enter your NETHZ name and password:
- Click 'Save...'. In the upcoming "No Certificate Authority..." window click button 'Ignore'.
- Click button 'close'

