|
Size: 4066
Comment:
|
← Revision 31 as of 2020-08-31 15:10:28 ⇥
Size: 6007
Comment:
|
| Deletions are marked like this. | Additions are marked like this. |
| Line 2: | Line 2: |
| <<TableOfContents(3)>> | |
| Line 3: | Line 4: |
| == Telephone Manual == | = Telephone Manuals = == OptiPoint 500 == |
| Line 6: | Line 8: |
| This page is a manual to simplify the handling of your telephone. | {{attachment:OptiPoint500.png}} |
| Line 8: | Line 10: |
| === Basics === | There is a [[attachment:OptiPoint500.png|German Manual for the OptiPoint 500]] which is relatively easy to read (''even if it is not in english''). The manual below just summarizes the most of the used tasks. == Basics == |
| Line 11: | Line 17: |
| ==== "Feste Anrufumleitung" ==== | === "Feste Anrufumleitung" === |
| Line 14: | Line 20: |
| 1. Goto "Service Menü" --> "Ziele" --> "Umleitung" --> "Feste Umleitung". | 1. Goto '''Service Menü''' {{{-->}}} '''Ziele''' {{{-->}}} '''Umleitung''' {{{-->}}} '''Feste Umleitung''' |
| Line 16: | Line 22: |
| 1. To activate or deactivate the bypass press the Button "Anruf umleiten" on your telephone. | 1. To activate or deactivate the bypass press the Button {{{Anruf umleiten}}} on your telephone. |
| Line 18: | Line 24: |
| ==== "Anruf weitergeben" ==== | === "Anruf weitergeben" === |
| Line 21: | Line 27: |
| 1. During the call, press "Rückfrage". | 1. During the call, press {{{Rückfrage}}}. |
| Line 25: | Line 31: |
| ==== "Kurzwahl" ==== | === "Kurzwahl" === |
| Line 28: | Line 34: |
| 1. Goto "Service Menü" --> "Ziele" --> "Kurzrufnummer". | 1. Goto '''Service Menü''' {{{-->}}} '''Ziele''' {{{-->}}} '''Kurzrufnummer'''. |
| Line 31: | Line 37: |
| 1. To use quick dialing you have to enter "*1<shortcut>". Example: "*13". Where 3 is the number of the shortcut. | 1. To use quick dialing you have to enter '''*1<shortcut>'''. Example: {{{*13}}}. Where 3 is the number of the shortcut. |
| Line 33: | Line 39: |
| ==== "Tastenbelegung" ==== | === "Tastenbelegung" === |
| Line 36: | Line 42: |
| 1. Goto "Service Menü" --> "Tastenbelgung". | 1. Goto '''Service Menü''' {{{-->}}} '''Tastenbelgung'''. |
| Line 39: | Line 45: |
| 1. To use quick dialing you have to enter "*1<shortcut>". Example: "*13". Where 3 is the number of the shortcut. | 1. To use quick dialing you have to enter '''*1<shortcut>'''. Example: {{{*13}}}. Where 3 is the number of the shortcut. |
| Line 41: | Line 47: |
| === Voice Mailbox === To adjust your voice mail box, you will have to have activated your voice mail service beforehand. If it isn't activated, you have to request a voice mail box here: |
== Additional Phones == There are two other phone models which are used at ETH. They have similar functions as the !OptiPoint 500 has. Please read the short manuals below (again, in German) to find the functions and how to configure them. |
| Line 44: | Line 50: |
| * https://helpdesk-anfrage.ethz.ch/hdweb/TelVoiceMailAnfragePre.do | === OpenStage 40 === {{attachment:OpenStage40.png}} |
| Line 46: | Line 53: |
| If you already have the service set up, follow these steps to adjust you personal voice mail box. | [[attachment:Schnelleinstieg_OpenStage_40_SIP.pdf]] |
| Line 48: | Line 55: |
| If these steps don't cover your requirements, there is a precise description here: | === Openscape CP600 === {{attachment:OpenScapeCP600.png}} |
| Line 50: | Line 58: |
| * English: https://www1.ethz.ch/id/services/list/telefonie/voicemailportal/voice_mail_eng.pdf * German: https://www1.ethz.ch/id/services/list/telefonie/voicemailportal/voice_mail_ger.pdf |
[[attachment:openscape-cp600-kurzanleitung.pdf]] |
| Line 53: | Line 60: |
| ==== Step 1: Logging into the client assistant and changing passwords ==== At first, you have to log into the [[https://www.voicemail.ethz.ch/cgi_bin/clientassistant/|client assistant]]. You will need to use your '''NETHZ Login name'''. The initial password is '''xpressions'''. Immediately after you've logged in, you have to '''change your password''' at the top of the site. Additionally you have to change your telephone password, to open your inbox messages. You can do this in the __Voice Mail System settings__. Your default password is '''12345''' and the new one has to have at least 5 digits also. |
|
| Line 56: | Line 61: |
| ==== Step 2: Create a new recording ==== To create a new recording, you have to go to the menu __Recordings__. |
|
| Line 59: | Line 62: |
| {{attachment:voicemail_recording_1.jpg}} | = Voice Mailbox = All Information about the Voice Mailbox can be found [[https://ethz.ch/services/en/it-services/catalogue/communication/telephony.html|here]]. Below you can read some quickstart procedure. |
| Line 61: | Line 65: |
| Enter the number of the telephone you want to record the greeting for. | == Request the voice-mail service == A personal Voice Mail service is associated to a personal telephone, that is: one that is used by one single person and is associated to this person in the ETHZ Mail Address List. |
| Line 63: | Line 68: |
| Please be sure to use the '''international telephone number format'''! (e.g '''41446320909'''). | In this case, the first step is to request the voice-mail Service using the Nethz Tool: |
| Line 65: | Line 70: |
| '''Rrring Rrring...''' Your phone is ringing. | 1. Go to old Nethz Interface at [[https://idn.ethz.ch]] 1. Select {{{meine Services}}} 1. Look for the service {{{Phone}}} 1. Below the title {{{Aktion}}} click on the button {{{Voice-Mail aktivieren}}}. {{attachment:nethz_voicemail.jpg}} |
| Line 67: | Line 76: |
| Now you can use your phone as a microphone. Use the following interface to tape your greeting. When you have finished your recording, click exit. No fear, now you can choose between saving and deleting the message. | You will have to wait maximal 15 minutes until the service is registered and active. You will know that the service is active when you receive a notification mail from the voice mail service with your access PIN. |
| Line 69: | Line 78: |
| ==== Step 3: Use the recordings ==== To use the recorded greetings, you have to use the timesheet. Here you can choose for which event you want to play which greeting. |
At this point, your voice mail service is configured, and you can access your mailbox via voice right away or make additional configurations by calling the number 38880 and identifying yourself with the PIN number received. |
| Line 72: | Line 80: |
| {{attachment:voicemail_time.jpg}} | == Use the voice-mail service == |
| Line 74: | Line 82: |
| ==== Step 4: Use the mailbox ==== To use the mailbox, you have to configure a "Feste Anrufumleitung" like it is described upstairs. You have to insert the number '''29990'''. |
To use the answering machine function you still need to redirect your calls to the number 38880 in your desktop telephone. |
| Line 77: | Line 84: |
| Depending on your telephone set, it is possible to redirect your calls in the following three sceneries: * Redirect ALL your calls. In this case all incoming calls, will be directly forwarded to the UM service. Your telephone won't even ring. * Redirect calls if the line is busy * Redirect calls if after a certain time no one answers them Those redirect options will have to be configured using your desk telephone. How to do it depends on the model you are using. Instructions on how to configure your desk telephone are published in the Informatik Dienste pages, in the Telephony section. == First Setup == It is advisable to customize your voice-mail, before using it. The first setup has to be done on the telephone. To perform this operation you will need the PIN you received in the notification mail. 1. The first time you dial into the UM Service number (38880) you will be asked to set up your greeting and name identifier: Call extension 38880 (extern +41446338880) in your desk phone 1. If you are not calling from your office phone, you will need to enter your 5 digit extension 1. The automated system will pronounce your name and ask to you enter your PIN 1. Enter your PIN and press # 1. Follow the prompts to record your name in your own voice. This will serve as identification to your callers 1. Follow the prompts to record a personal greeting, which will be played to callers when you are not able to answer. You can always change this later. If you do not record a greeting a standard greeting will be played instead. The initial setup is now complete and you can choose to access your mailbox now or end the session. You can learn more about available functions and configuration options of the voice-mail service in these documents: * Voice Mail Service: description and general information: "Voice Mail en.pdf" * How do you use rules with the voice mail service: "Voice Mail Rules en.pdf" * Question & Answers: "Voice Mail Q&A en.pdf" |
Contents
Telephone Manuals
OptiPoint 500
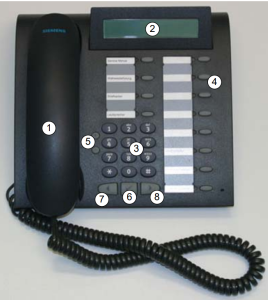
The most widley used phone at D-ITET is the OptiPoint 500 Telephone.

There is a German Manual for the OptiPoint 500 which is relatively easy to read (even if it is not in english).
The manual below just summarizes the most of the used tasks.
Basics
Here can you see the basic functions of the telephone, that are often used. To open the basic menu, press one of the two arrow keys.
"Feste Anrufumleitung"
To setup a bypass, follow these steps:
Goto Service Menü --> Ziele --> Umleitung --> Feste Umleitung
- Enter the destination-number.
To activate or deactivate the bypass press the Button Anruf umleiten on your telephone.
"Anruf weitergeben"
During a call you can pass it on to another extension by executing following steps:
During the call, press Rückfrage.
- Enter the number you want to connect with. Now you can speak to this person.
- As soon as you have rung off, the call is passed on to the third party.
"Kurzwahl"
To set up quick dialing for a number, you have to follow these steps:
Goto Service Menü --> Ziele --> Kurzrufnummer.
- There you have to choose a shortcut between 1 to 9.
- If the chosen shortcut happens to be free, you can enter the number. Otherwise you will have to replace the number.
To use quick dialing you have to enter *1<shortcut>. Example: *13. Where 3 is the number of the shortcut.
"Tastenbelegung"
To set up the button functions, you have to follow these steps:
Goto Service Menü --> Tastenbelgung.
- Now you can choose the button you want to configure.
- You can choose between the functions and then you can confirm with th
To use quick dialing you have to enter *1<shortcut>. Example: *13. Where 3 is the number of the shortcut.
Additional Phones
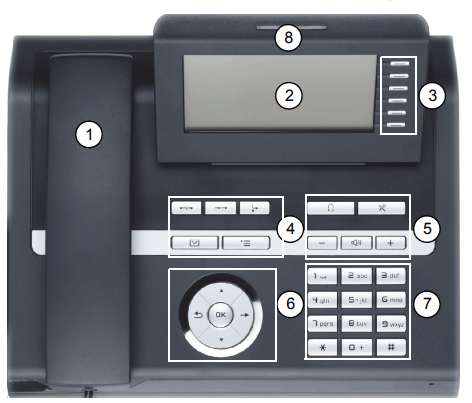
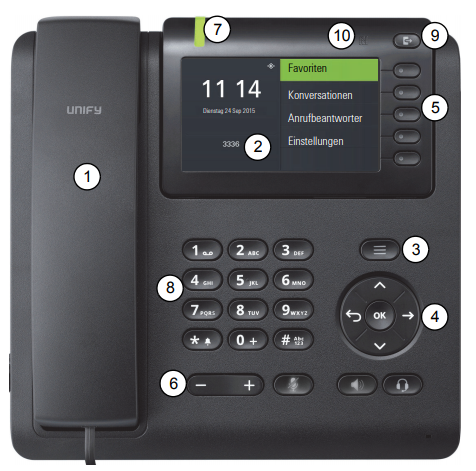
There are two other phone models which are used at ETH. They have similar functions as the OptiPoint 500 has. Please read the short manuals below (again, in German) to find the functions and how to configure them.
OpenStage 40

Schnelleinstieg_OpenStage_40_SIP.pdf
Openscape CP600

openscape-cp600-kurzanleitung.pdf
Voice Mailbox
All Information about the Voice Mailbox can be found here. Below you can read some quickstart procedure.
Request the voice-mail service
A personal Voice Mail service is associated to a personal telephone, that is: one that is used by one single person and is associated to this person in the ETHZ Mail Address List.
In this case, the first step is to request the voice-mail Service using the Nethz Tool:
Go to old Nethz Interface at https://idn.ethz.ch
Select meine Services
Look for the service Phone
Below the title Aktion click on the button Voice-Mail aktivieren.

You will have to wait maximal 15 minutes until the service is registered and active. You will know that the service is active when you receive a notification mail from the voice mail service with your access PIN.
At this point, your voice mail service is configured, and you can access your mailbox via voice right away or make additional configurations by calling the number 38880 and identifying yourself with the PIN number received.
Use the voice-mail service
To use the answering machine function you still need to redirect your calls to the number 38880 in your desktop telephone.
Depending on your telephone set, it is possible to redirect your calls in the following three sceneries:
- Redirect ALL your calls. In this case all incoming calls, will be directly forwarded to the UM service. Your telephone won't even ring.
- Redirect calls if the line is busy
- Redirect calls if after a certain time no one answers them
Those redirect options will have to be configured using your desk telephone. How to do it depends on the model you are using. Instructions on how to configure your desk telephone are published in the Informatik Dienste pages, in the Telephony section.
First Setup
It is advisable to customize your voice-mail, before using it. The first setup has to be done on the telephone. To perform this operation you will need the PIN you received in the notification mail.
- The first time you dial into the UM Service number (38880) you will be asked to set up your greeting and name identifier: Call extension 38880 (extern +41446338880) in your desk phone
- If you are not calling from your office phone, you will need to enter your 5 digit extension
- The automated system will pronounce your name and ask to you enter your PIN
- Enter your PIN and press #
- Follow the prompts to record your name in your own voice. This will serve as identification to your callers
- Follow the prompts to record a personal greeting, which will be played to callers when you are not able to answer. You can always change this later. If you do not record a greeting a standard greeting will be played instead.
The initial setup is now complete and you can choose to access your mailbox now or end the session.
You can learn more about available functions and configuration options of the voice-mail service in these documents:
- Voice Mail Service: description and general information: "Voice Mail en.pdf"
- How do you use rules with the voice mail service: "Voice Mail Rules en.pdf"
Question & Answers: "Voice Mail Q&A en.pdf"