|
Size: 2355
Comment:
|
Size: 2939
Comment:
|
| Deletions are marked like this. | Additions are marked like this. |
| Line 58: | Line 58: |
| . Select the appropriate file type and click OK. In the below screenshot, accept the location and '''select an appropriate filename e.g. archive2009.pst''' | . Select the appropriate file type and click OK. In the below screenshot, accept the location and '''select an appropriate filename e.g. archive2009.pst''' This name is the filename as you would see it in Windows Explorer. |
| Line 62: | Line 62: |
| . Click on OK | . Click on OK. In the "Create Microsoft Personal Folders" in the field "File" you see the path and the filename as you specified it before. The name you can enter here is the '''display name in Outlook'''. This display is independent of the actual file name. For the sake of simplicity it is recommended to make them the same. If you want you can also specify a password to protect this .pst file. Make sure you don't forget the password as we will not be able to retrieve the password from the file. {{attachment:PST04.png}} |
Contents
Configure Your Email Account
- Open the Control Panel, double-click the Mail icon:
- Create a new profile:
- Click on Add... and enter a profile name e.g. your username or "default"
- When clicking OK, Outlook will automatically determine your First name, Last name and Email address.
If the information is incorrect, you can correct it.
- Click on Next
- Outlook will try to automatically detect your email settings. If you are the owner of several accounts or aliases, you will be presented with the screen below. Select one of the accounts and click on Properties. In the field "E-mail adress", scroll to the right end to check whether this is the correct account. If you have selected the right account, click on OK.
- If you see the screenshot below, you have configured your email account. Click on Finish and start Outlook.
.PST and .OST Storage Location
Depending on your configuration, you might not need a .pst file anymore. Please see the table below to determine whether your configuration:
Email Server \ Email Client |
Thunderbird |
Outlook |
|
|
|
MS Exchange (ID) |
- |
.OST |
Postfix (ISG.EE) |
- |
.PST |
After starting your email client, the appropriate file is created and stored in C:\Users\<USERNAME>\AppData\Local\Mail The files in this location are stored locally and not copied to your homedirectory in H:
Adding A Local Mail Storage File
You can add .pst files it Outlook for any purposes e.g. as archive. This is very much recommended because .pst files should not be bigger than 2GB. You can circumvent this by creating an archive and moving older mails to the archive.
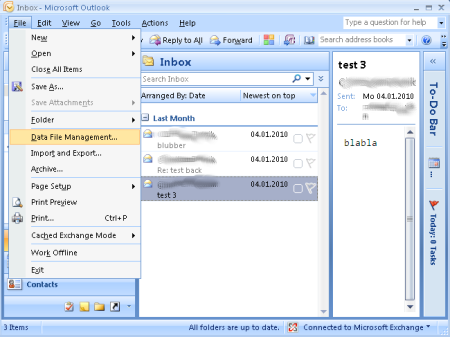
Open Outlook, click on File -> Data File Management

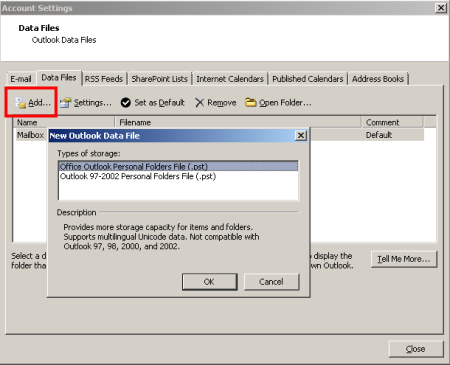
This will open the Account Settings dialog. Cllick on Add... to open the New Outlook Data File dialog.

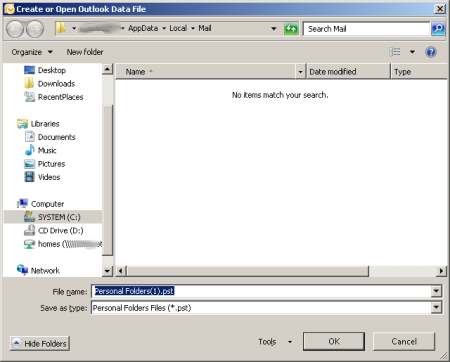
Select the appropriate file type and click OK. In the below screenshot, accept the location and select an appropriate filename e.g. archive2009.pst This name is the filename as you would see it in Windows Explorer.

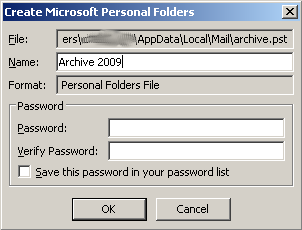
Click on OK. In the "Create Microsoft Personal Folders" in the field "File" you see the path and the filename as you specified it before. The name you can enter here is the display name in Outlook. This display is independent of the actual file name. For the sake of simplicity it is recommended to make them the same. If you want you can also specify a password to protect this .pst file. Make sure you don't forget the password as we will not be able to retrieve the password from the file.
