|
Size: 1317
Comment:
|
Size: 3656
Comment:
|
| Deletions are marked like this. | Additions are marked like this. |
| Line 4: | Line 4: |
| /* = How do I show news only on the institute page? =*/ /* = How do I show news on the institute page and on the departments home page? =*/ |
= How do I create a news/event entry? = ==== Answer ==== 1. Open the News or the Events folder, respectively. Then open the folder of your institute. {{attachment:news1.jpg}} 2. If you want your news '''to be shown on the department's page as well''' as on your institute's page, skip to step 4. 3. If you want your news to be shown '''only on your institute's page'''. Open the '''subfolder '' 'local news' '''''. 4. Click on the '''icon '' 'New record' '''''. {{attachment:news2.jpg}} 5. Select ''' Type '' 'News' '' ''' and enter the needed information. The fields ''''' 'Start', 'Stop' ''''' indicate the duration in which the news is shown in the frontend. {{attachment:news3.jpg}} 6. If your record is an event click the '''flag '' 'Event Info' ''''' and check the ''' box '' 'Event' '''''. {{{#!wiki important If you create an event, make sure that the date you enter in the '''field '' 'General -> Date/Time' ''''' is the same than the date you enter in the '''field '' 'Event Info -> From'. ''''' The date entered in 'General' is the one shown in the front end while the date entered in 'Event Info' is the date used to sort the events. }}} {{attachment:news4.jpg}} = How do I show news/events only on the institute page? = ==== Answer ==== See in the first Question (How do I create a news/event entry? ) step 3. = How do I show news/events on the institute page and on the departments home page? = ==== Answer ==== See in the first Question (How do I create a news/event entry? ) step 2. |
| Line 12: | Line 57: |
| 1. If you want to edit an event, you see the following view. First of all check, if you didn't hide your event. The ''' box '' 'Hide' '' ''' must not be checked. | 1. If you want to edit an event, you see the following view. First of all check, if you didn't hide your event. The ''' box '' 'Hide' '' ''' must '''not''' be checked. |
| Line 27: | Line 72: |
| {{attachment:people.gif}} | |
| Line 39: | Line 83: |
= I published the information about a lecture and want the names of the lecturers to link to their personal pages. = ==== Solution ==== 1. Make sure that you set the relevant people in the corresponding fields in the editing form of your lecture. {{attachment:backlink1.jpg}} 2. Close the editing form and click on the folder where your lecture data is stored. Create a new content by clicking on the '''icon '' 'Create new record' '' ''' in the uppermost icon bar. A tree of possible content types opens: {{attachment:backlink2.jpg}} 3. Choose ''''' 'Backlinks for people/studies/research' '''''. The following form opens: {{attachment:backlink3.jpg}} 4. Choose the folder where your plugin which displays the data of your lecture is implemented as backlink. 5. Save and close. Your folder should now look similar to this. Important are the marked content records. {{attachment:backlink4.jpg}} |
Contents
- How do I create a news/event entry?
- How do I show news/events only on the institute page?
- How do I show news/events on the institute page and on the departments home page?
- An event entry is not visible in front end. How can I make it visible?
- A publication doesn't show up in the author's publication list.
- I published the information about a lecture and want the names of the lecturers to link to their personal pages.
How do I create a news/event entry?
Answer
1. Open the News or the Events folder, respectively. Then open the folder of your institute.
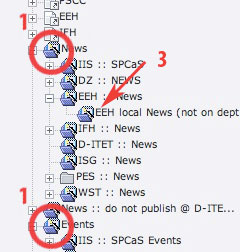
2. If you want your news to be shown on the department's page as well as on your institute's page, skip to step 4.
3. If you want your news to be shown only on your institute's page. Open the subfolder 'local news' .
4. Click on the icon 'New record' .
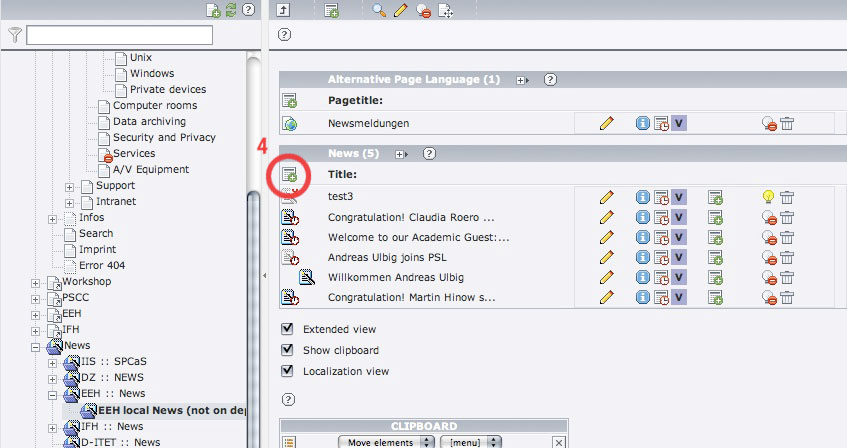
5. Select Type 'News' and enter the needed information. The fields 'Start', 'Stop' indicate the duration in which the news is shown in the frontend.
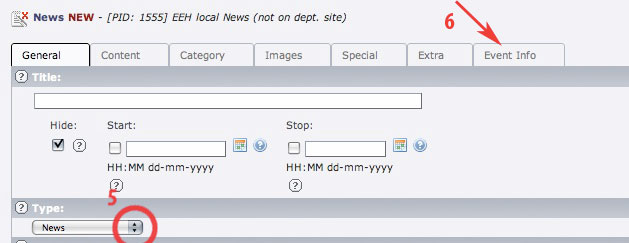
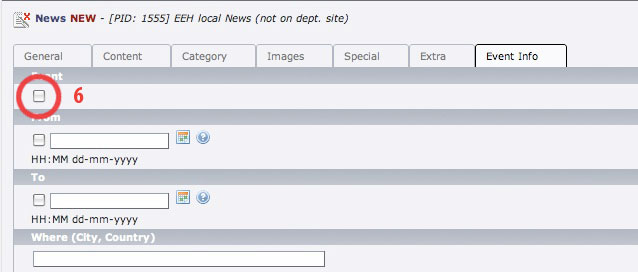
6. If your record is an event click the flag 'Event Info' and check the box 'Event' .
If you create an event, make sure that the date you enter in the field 'General -> Date/Time' is the same than the date you enter in the field 'Event Info -> From'. The date entered in 'General' is the one shown in the front end while the date entered in 'Event Info' is the date used to sort the events.
How do I show news/events only on the institute page?
Answer
See in the first Question (How do I create a news/event entry? ) step 3.
How do I show news/events on the institute page and on the departments home page?
Answer
See in the first Question (How do I create a news/event entry? ) step 2.
An event entry is not visible in front end. How can I make it visible?
Answer
1. If you want to edit an event, you see the following view. First of all check, if you didn't hide your event. The box 'Hide' must not be checked.
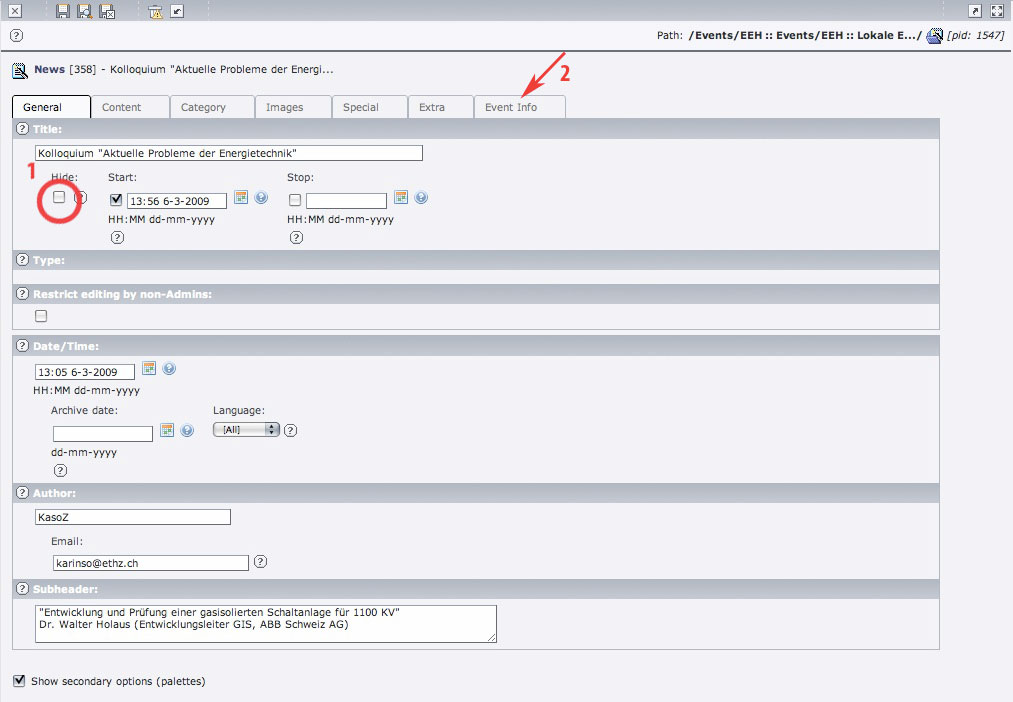
2. Click on the flag 'Event Info'
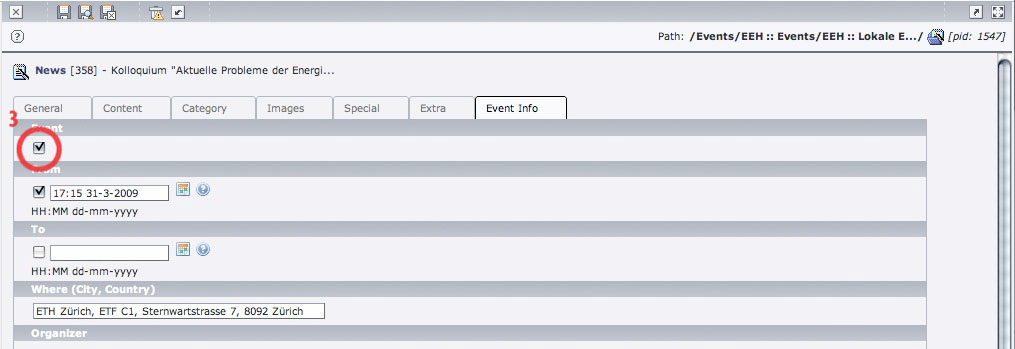
3. Make sure that you check the box 'Event' .
A publication doesn't show up in the author's publication list.
Solution
1. If you want to put up a publication, you are confronted with the following form:
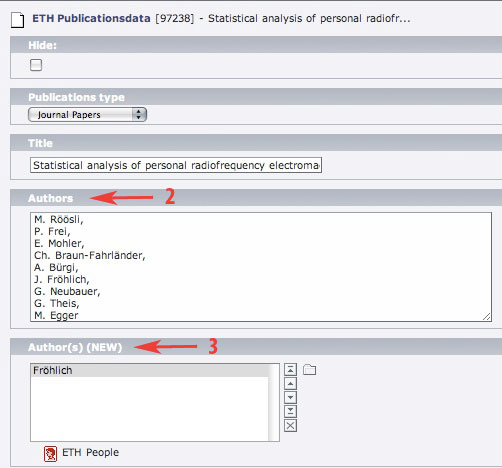
2. Write all authors of the publication into the field 'Authors' . This are the people which show up in the description of the publication.
3. If the author has a personal page on your page, you should add him to the field 'Authors (NEW)' as well. Otherwise this publication will not show up in his personal publications list. In this example, Fröhlich is the only one with a personal page on the department page.
I published the information about a lecture and want the names of the lecturers to link to their personal pages.
Solution
1. Make sure that you set the relevant people in the corresponding fields in the editing form of your lecture.
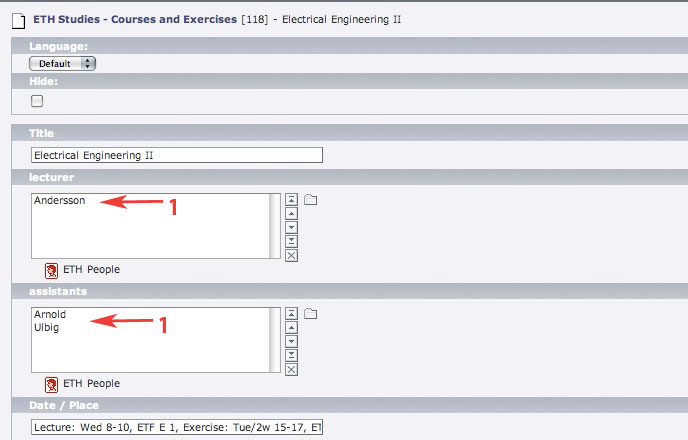
2. Close the editing form and click on the folder where your lecture data is stored. Create a new content by clicking on the icon 'Create new record' in the uppermost icon bar. A tree of possible content types opens:
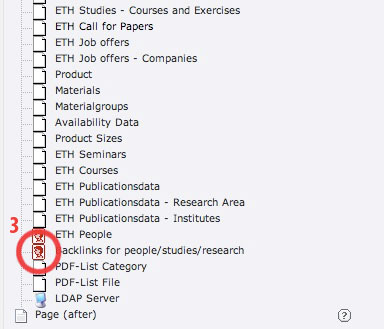
3. Choose 'Backlinks for people/studies/research' . The following form opens:
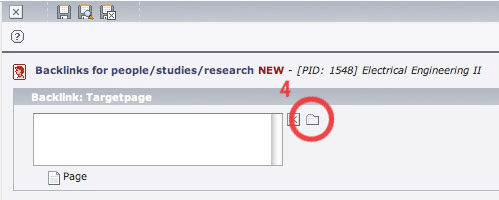
4. Choose the folder where your plugin which displays the data of your lecture is implemented as backlink.
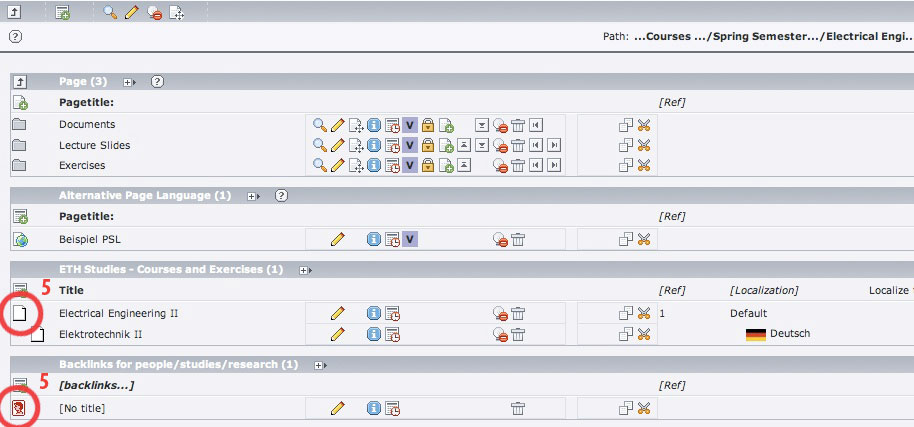
5. Save and close. Your folder should now look similar to this. Important are the marked content records.
