|
Size: 5071
Comment:
|
Size: 5408
Comment:
|
| Deletions are marked like this. | Additions are marked like this. |
| Line 6: | Line 6: |
| == Accessing Samba shares from Linux with Gnome (all machines at ETH) == | == Three methods accessing Samba shares from Linux with Gnome (all machines at ETH) == |
| Line 8: | Line 8: |
| Three methods exist to access a Samba share in Gnome: | === Mountpoint === |
| Line 10: | Line 10: |
| === Nautilus === | In all cases, the share will be mounted in `/run/user/$UID/gvfs/smb-share:server=XXX,share=XXX` so that you can also access it on the command line. |
| Line 12: | Line 12: |
| Select {{{Go > Location...}}} in the menu bar and enter the share in the {{{Location}}} field, e.g. as {{{smb://homes.ee.ethz.ch/smbtest}}}. Enter the details as given in the screenshot below. {{attachment:gvfs-nautilus.png}} === Connect to Server === Open the {{{Connect to Server}}} application and enter the details similar to the screenshot below. {{attachment:gvfs-connect-to-server.png}} === gvfs-mount === |
=== 1. gvfs-mount === |
| Line 35: | Line 23: |
To unmount a share on the command line, just add the {{{-u}}} flag: {{{ mmuster@testclient:~> gvfs-mount -u smb://homes.ee.ethz.ch/smbtest }}} === 2. Nautilus Application === Select on the left side '''Connect to network''' and enter the name of the share in the '''Server Address''' field, e.g. as 'smb://homes.ee.ethz.ch/smbtest'. Enter the details as given in the screenshot below. {{attachment:gvfs-nautilus.png}} === 3. 'Connect to Server' Application === Open the {{{Connect to Server}}} application and enter the details similar to the screenshot below. {{attachment:gvfs-connect-to-server.png}} |
The Transparent Remote File-System Access Method
An alternative to the explicit transfer of files from one machine to another is to attach the remote filesystem to the local machine such that all programs can access it as if it was just another local partition. There are several solutions to this problem, the classical examples are NFS and AFS. At the ETH we are using both of them extensively. Unfortunately NFS has security issues which prevent it from being used in an open environment, and AFS requires special (complex) software on the client side and fundamental changes in the setup of servers. We therefore currently recommend Samba for remote filesystem attachment. Samba is a free implementation of the Microsoft File Sharing Protocol (SMB). We are running it on all our Unix servers. This enables Windows computers to access files on the Unix machines as if they were on a normal Windows server. Linux is also able to access Samba and mount it just like any other file system. SMB does not encrypt the data it transfers (unlike SSH) but it uses a special method for password authentication which protects the privacy of the password.
Three methods accessing Samba shares from Linux with Gnome (all machines at ETH)
Mountpoint
In all cases, the share will be mounted in /run/user/$UID/gvfs/smb-share:server=XXX,share=XXX so that you can also access it on the command line.
1. gvfs-mount
You can also connect to a Samba share on the command line. After you run that command, you can browse the share in Nautilus.
mmuster@testclient:~> gvfs-mount smb://homes.ee.ethz.ch/smbtest
Password required for share smbtest on homes.ee.ethz.ch
User [mmuster]: d\mmuster
Domain [WORKGROUP]: d
Password: ********
To unmount a share on the command line, just add the -u flag:
mmuster@testclient:~> gvfs-mount -u smb://homes.ee.ethz.ch/smbtest
2. Nautilus Application
Select on the left side Connect to network and enter the name of the share in the Server Address field, e.g. as 'smb://homes.ee.ethz.ch/smbtest'.
Enter the details as given in the screenshot below.
3. 'Connect to Server' Application
Open the Connect to Server application and enter the details similar to the screenshot below.
Accessing Samba shares from Linux with Konqueror (all machines at ETH)
Open your Konqueror Filemanager/Webbrowser.
As location, use smb://server/directory followed by <Enter>Type your username and password in the following dialog box.
For accessing your share provided from ID, use the following data:
Location:   smb://nas-nethz-users.ethz.ch/share-u-$/username
Username:   d\yourNethzUsername
Password:   yourPrivatePassword

Obs! The 'share-u-$' part of the location is dependant on the first character in your  username. If your username is 'kpelle', this part of the location will change to 'share-k-$'
For accessing your D-ITET share, user the following:
Location:   smb://homes.ee.ethz.ch/username
Username:   d\username
Password:   yourPrivatePassword
Using CIFS to connect to Samba shares
You can also mount your Samba home area with CIFS. This method is only available on computers where you have root access (i.e. this does not work on Linux workstations managed by us). If the command returns an error message saying "wrong fs type", make sure the package "cifs-utils" is installed.
$ sudo su
# mkdir /tardis-home
# mount -t cifs -o user=<d\your_tardis_login>,name=homes.ee.ethz.ch \\\\homes.ee.ethz.ch\\<d\your_tardis_login>  /tardis-home
Recent Linux Kernels contain the userspace filesystem FUSE. This allows you to use all sorts of new an inovative ways for mounting remote fileystems ... for example you can mount a file system via an ssh connection without needing root privileges:
$ mkdir ~/tardis-home
$ sshfs <d\your_tardis_login>@login.ee.ethz.ch: ~/tardis-home
But please note, that you can't do sshfs on homes.ee.ethz.ch - use login.ee.ethz.ch instead!
You can also unmount it again by typing:
$ fusermount -u ~/tardis-home
Please note that sshfs is not officially supported by the ISG.EE
Windows Network Drive
You can access your home directory by mounting \\homes.ee.ethz.ch\username as network drive in Windows.
If you do this from outside ETH, you need to create a VPN connection first.
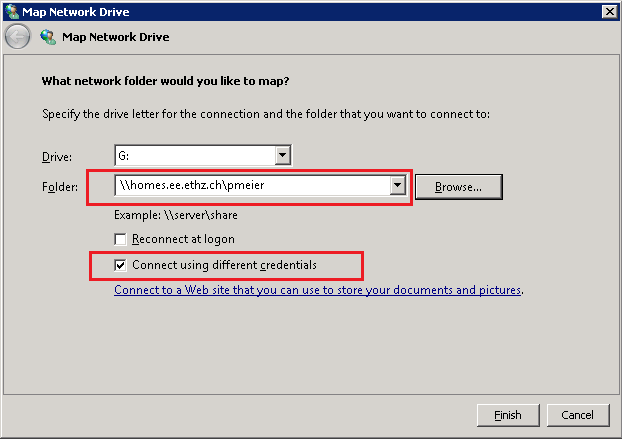
Click on the Computer shortcut and then click on the 'Map network drive' button from the upper toolbar.
Select the drive letter you want to use for this mapping. The Address to your folder is \\homes.ee.ethz.ch\YOUR-USERNAME. Im this example its pmeier. Replace pmeier with your username. Set the Checkbox "Connect using different credentials" and if you want, set "Reconnect at logon". Click on finish.

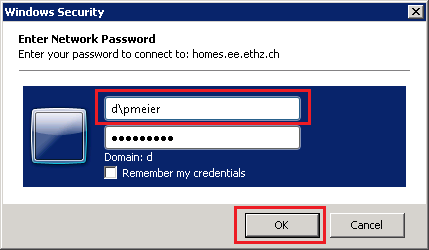
On the next screen, Enter d\YOUR-USERNAME and Enter your password. When done, click on OK.

If the mapping process worked fine, the newly created drive will open and will become available.