|
Size: 3876
Comment:
|
Size: 2089
Comment:
|
| Deletions are marked like this. | Additions are marked like this. |
| Line 1: | Line 1: |
| {{{#!wiki caution '''This page is currently being edited''' An Administrator is updating this page. Please note that as long as this notice is visible, information on this page may be '''inaccurate, incomplete and subject to change'''. Proceed with caution. }}} |
|
| Line 7: | Line 2: |
| = Setting up the printers for a Macintosh client = | = Setting up the VPP printers for a Macintosh client = |
| Line 10: | Line 5: |
| == Setting up the printers for an ISG.EE-Managed Mac Client == /!\ This method works only on Macs which are connected at D-ITET to the ETH network |
Please use following instruction to setup a printer on a unmanaged Mac Client |
| Line 13: | Line 7: |
| Open "'''Printer Setup Utility'''" (usually under "/Applications/Utilities") and click the "Add" button: {{attachment:printer_setup_utility.jpg}} Now the "Printer Browser" dialogue opens. Jump to the tab "'''Default Browser'''". Select the printer to be installed and click the "Add" button. The printers which are published with our printing services are the "'''VPP'''"-ones, which are shown as ''shared printers'': {{attachment:printer_browser.jpg}} '''Alternatively''' you could also open the "System Preferences" (icon in the Dock bar), then click the "Print & Fax" icon, where new printers can be added using the "'''[+]'''" button: {{attachment:system_prefs_print_fax.jpg}} ''If you want to start printing'' now, go on reading the article [[Printing/VPPPrinting/Mac]]. == Setting up a printer for an unmanaged Mac Client (private laptops etc.) == There are two methods to setup the printer we provide with our services: ==== First Method: Install some printers with the provided PPD file (recommended for most users) ==== * On Mac-OSX Tiger: Open your "Printer Setup Utility" (normally under "/Applications/Utilities") and click on "more Printers" '''while pressing the Alt-Key'''. * On Mac-OSX Leopard: Open your "System Preferences", select "Print&Fax" and click on the '''[+]'''-Button. Select and fill in the parameters like it is shown on the image and download the appropriate PPD (driver) file, which enables you to use the VPP-Parameters: |
First of all, download the PPD that fits the printer you wish to use: |
| Line 36: | Line 9: |
| ||ETZSPEZ-HPZ6100 ||[[attachment:ISGvppHPZ6100.ppd]] || ||ETZSPEZ-X7760 ||[[attachment:ISGvppX7760.ppd]] || ||STWC-LANIER ||[[attachment:ISGvppLAN5645.ppd]] || ||ISGEE-LANIER, ETFC-LANIER ||[[attachment:ISGvppLAN124C3.ppd]] || ||all other printers ||[[attachment:VPPA3_01.PPD]] || |
||all VPP printers ||[[attachment:vppa3_06.ppd]] || |
| Line 45: | Line 14: |
| After you have downloaded the PPD file, open the dropdown box "Print Using" (as shown below) and choose "Other...": | After that, install the printer by following the instructions below: ||'''No.''' ||'''Step''' ||'''Picture''' || ||1 ||Open "Print & Fax" Preference Pane. || {{attachment:sl_shot01.png}} || ||2 ||Press the small '+'-Button in lower left area of the preference pane. || {{attachment:sl_shot02.png}} || ||3 ||Press ''IP'' at the top of the new window. || {{attachment:sl_shot03.png}} || ||4 ||Change the ''Protocol'' dropdown to ''Line Printer Daemon - LPD''. || {{attachment:LPD.png}} || ||5 ||Set ''Address'' to '''vpp-"destination".ethz.ch'''. As example etlf27-1 as destination. The name of the Queue '''always begins with the destination Name "''destination/'''''", the second part is constructed from '''the printer's model name and vppdriver and name separated by a dash''', all '''lowercase'''. Valid locations and printer names can be looked up here: [[http://www.vppspy.ethz.ch/tools/vpplist.php|VPP Destination List]]. You can choose ''Name'' and ''Location'' freely, but it's a real good idea to enter something meaningful, so you recognize the Printer later on. || {{attachment:VPPDriver.png}} || ||6 ||Choose ''Other...'' for the dropdown under ''Print Using''. || {{attachment:sl_shot06.png}} || ||7 ||In the File Dialog, choose the PPD you downloaded earlier. ||''(none)'' || ||8 ||If you've done everything correctly, the new printer is now listed in the preference pane. Make sure to leave "Share this printer on the network" unchecked. || {{attachment:sl_shot07.png}} || |
| Line 47: | Line 25: |
| {{attachment:tigerprint1.jpg}} | |
| Line 49: | Line 26: |
| . A file open dialogue should open where you can select the PPD file you've just downloaded. | |
| Line 51: | Line 27: |
| /!\ Note: If you cannot make your printing configuration work this way, you may try to reset your printer configuration. To do that, right click on the printer list as shown in the image below and select "Reset Printing System". Attention: this will delete all your currently installed printers. | = Printing problems = |
| Line 53: | Line 29: |
| {{attachment:system_prefs_print_fax.jpg}} | Alternatively you can print through the VPP Form: |
| Line 55: | Line 31: |
| ==== Second Method: Install all printers using cupsd.conf modifications (for advanced users) ==== This method allows you to print to D-ITET printers on your private Mac as if it were a managed client (see above). |
[[http://idvpp01.ethz.ch/vpppdf.html|Send PDF VPP Job]] [[http://idvpp01.ethz.ch/vpp.html|Send VPP Job]] |
| Line 58: | Line 33: |
| * /!\ To use this method, your computer must be connected to the D-ITET ETH network (e.g. public LAN socket). Edit {{{ /etc/cups/cupsd.conf }}} as user {{{ root }}}. Add/modify the following lines: {{{ Browsing On BrowseProtocols cups BrowseAllow ipp2vpp.ee.ethz.ch BrowsePoll ipp2vpp.ee.ethz.ch BrowsePort 631 }}} Save the {{{ cupsd.conf }}} file and restart the cups service: * OSX '''Tiger''': {{{ /System/Library/StartupItems/PrintingServices/PrintingServices restart }}} * OSX '''Leopard''': {{{ launchctl stop org.cups.cupsd ; launchctl start org.cups.cupsd }}} ''If you want to start printing'' now, go on reading the article [[Printing/VPPPrinting/Mac]]. |
---- [[CategoryPRMT]] |
Setting up the VPP printers for a Macintosh client
Please use following instruction to setup a printer on a unmanaged Mac Client
First of all, download the PPD that fits the printer you wish to use:
Printer name |
Driver file |
all VPP printers |
After that, install the printer by following the instructions below:
No. |
Step |
Picture |
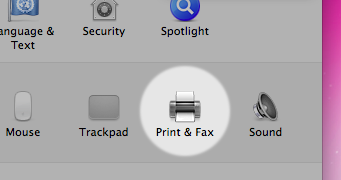
1 |
Open "Print & Fax" Preference Pane. |
|
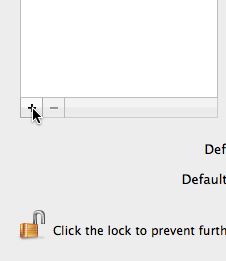
2 |
Press the small '+'-Button in lower left area of the preference pane. |
|
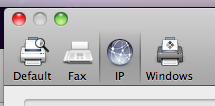
3 |
Press IP at the top of the new window. |
|
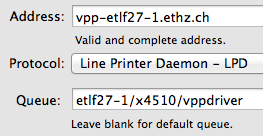
4 |
Change the Protocol dropdown to Line Printer Daemon - LPD. |
|
5 |
Set Address to vpp-"destination".ethz.ch. As example etlf27-1 as destination. The name of the Queue always begins with the destination Name "destination/", the second part is constructed from the printer's model name and vppdriver and name separated by a dash, all lowercase. Valid locations and printer names can be looked up here: VPP Destination List. You can choose Name and Location freely, but it's a real good idea to enter something meaningful, so you recognize the Printer later on. |
|
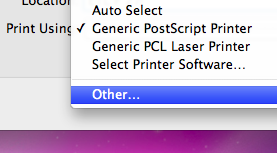
6 |
Choose Other... for the dropdown under Print Using. |
|
7 |
In the File Dialog, choose the PPD you downloaded earlier. |
(none) |
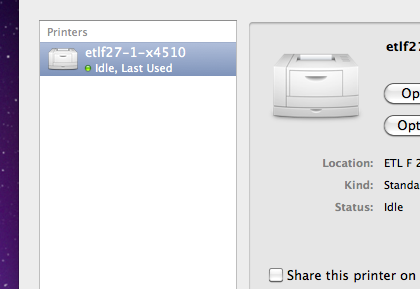
8 |
If you've done everything correctly, the new printer is now listed in the preference pane. Make sure to leave "Share this printer on the network" unchecked. |
|
Printing problems
Alternatively you can print through the VPP Form:
