Contents
What is VNC?
VNC (Virtual Network Computing) is a remote desktop software for several Operating Systems. It can be used for a single graphical application or for a full desktop session. Client and server interact over the Remote Framebuffer (RFB) Protocol. Technically the VNC server process on the target machine is an X-server with a virtual display attached to it. The VNC viewer on the client shows the content of this virtual display in his own window and transfers keyboard and mouse events to the VNC server.
How do I use VNC?
Starting the vncserver
In the following instructions pmusteris a placeholder to be replaced with your username, the hostname zampanois a placeholder for the host you want to connect to and run a VNC server on.
The start of the VNC server happens via an ISG.EE provided wrapper script vncserver in /usr/bin_override. You can check the correct path to this wrapper script with:
pmuster@zampano:~$ which vncserver
/usr/bin_override/vncserver
pmuster@zampano:~$
Login via ssh to the target machine and start vncserver. If you had never used vncserver before the startup of the vncserver process looks like this:
pmuster@zampano:~$ vncserver
Creating directory /home/pmuster/.vnc......
Creating startup_file /home/pmuster/.vnc/xstartup.....

You will require a password to access your desktops.

Password:
Verify:
Would you like to enter a view-only password (y/n)? n

New 'default' desktop is zampano:1

Creating default config /home/pmuster/.vnc/config
Starting applications specified in /home/pmuster/.vnc/xstartup
Log file is /home/pmuster/.vnc/zampano:1.log

pmuster@zampano:~$
In the output of the command the number after the colon of the hostname (zampano:1) is the virtual display number of your VNC server. You need this number to connect your VNC viewer to the correct listening port of your VNC server and also to manually kill the vcnserver process.
If the .vnc subdirectory in your home does not exist it is created at startup and you will be asked to define a password for accessing your server and another one for just observing without interacting. Also created is a default xstartup script which is executed by the vncserver:
pmuster@zampano:~$ cat .vnc/xstartup
#!/bin/sh
[ -r $HOME/.Xresources ] && xrdb $HOME/.Xresources
unset DBUS_SESSION_BUS_ADDRESS
xsetroot -solid grey
export XKL_XMODMAP_DISABLE=1
WRAPPERDIR="/usr/bin_override"
#
/etc/X11/Xsession
#---------------------------------------------------------------------------------------------------------
# Automatically end the server process after desktop session logout
#---------------------------------------------------------------------------------------------------------
$WRAPPERDIR/vncserver -kill $DISPLAY
#
pmuster@zampano:~$
You can use an optional desktop selection parameter
vncserver [xfce|gnome|kde|light|xterm]
at startup to use a different desktop session. If no specific desktop session is given then /etc/X11/Xsession which defaults to the Xfce4 desktop will be used. The desktop type light selects the light desktop Fluxbox. To use a desktop outside from Xfce4, GNOME, KDE, Fluxbox and Xterm please edit the your xstartup file in ~/.vnc according to your needs. The desktop type xterm starts a minimal desktop with a window manager and a xterm terminal window, here the applications must be started over the command line in the xterm.
The start of vncserver with no desktop parameter always looks for the xsession startup file ~/.vnc/xstartup in your home, if not found it's created with a desktop startup of the default xsession ( /etc/X11/Xsession ) which points to Xfce4. If you start vncserver with the optional desktop parameter a xstartup file ~/.vnc/xstartup.<desktop> is created in your home and used for subsequent startups with the same desktop parameter.
If you are using vncserver only for remote accessing some applications on the target machine please use the desktop type light or xterm but not the extremely heavyweight desktops GNOME or KDE. For "Work at home" you can use the heavyweight desktops (p.e. the default GNOME) but please logout from your computer in the office before you go home. We do not support the parallel usage of two heavyweight desktops (local and remote) from the same user on one machine.
For the GNOME desktop we use the TurboVNC software, all other desktops are provided by the TigerVNC software. TurboVNC's config file is ~/.vnc/config.turbo while TigerVNC uses ~/.vnc/config. To switch the configured default resolution of 1600x950 of the vncserver created display please comment out the geometry line in the configuration file and correct the resolution to your need.
Connecting the vncviewer
After the startup you can connect a VNC viewer software on your client to your VNC server. On our managed linux clients the command is:
> vncviewer zampano:1
On our managed windows clients we can install the baramundi software RealVNC for you. In the connect-popup window you have to enter the base tcp port number 5900 plus the display number:
RealVNC Viewer is free software and can be downloaded from https://www.realvnc.com .
Terminating a VNC session
As already mentioned above if you are performing a normal desktop logout in the VNC client your VNC server process is killed automatically by the vncserver -kill command after the termination of the desktop session in your xstartup script and you need to start a new one for the next session. If you only terminate the VNC viewer program your VNC server process remains active and you can reconnect your desktop session again.
To manually kill your vncserver on a host ssh to this host and enter the command:
> vncserver -kill :<display number>
VNC access from the internet
Due to security reasons the listening port of the VNC server is not directly reachable from a machine in the internet. There are two possibilities to perform a vnc session to an ETH network internal host from the internet:
- Use the Cisco SSL-VPN client software of ID and connect the SSL-VPN adapter before starting the VNC viewer programm
- Access the VNC server through an SSH-tunnel
Because you can't connect your personal client directly over ssh the SSH-tunnel solution is slightly complex and we recommend the VPN solution.
VNC through SSH tunnel under Linux
- Create an ssh tunnel for the vncserver 5901 port from your linux machine in the internet to your client in the ETH network over jumphost login.ee.ethz.ch:
$ ssh -L 5901:<client>.ee.ethz.ch:5901 <account>@login.ee.ethz.ch
- After successfull authentication you will get a terminal window on mira, our login server. If you have not an already running vncserver on your client machine you can start one with:
$ ssh <client> '/usr/bin_override/vncserver :1'
Attention! Always choose a strong password when starting vncserver. Otherwise, you'll make it trivial for intruders to hijack your account!
- Now you can connect a vncviewer on your internet machine to the vncserver on your client in the ETH network over localhost:1 ( sometimes localhost:5901 ). If you start vncviewer from a terminal use a second terminal. The terminal on mira must remain for the tunnel to work.
Note: An alternative with "transparent" access can be done by using the client configuration with the ProxyJump setting as described in establishing a remote terminal SSH session. This way you can more securely start the vncserver only listening on localhost on the client machine and access the server via
vncviewer -via remoteclienthost.ee.ethz.ch :1
where due to the SSH client configuration you will be proxied trough login.ee.ethz.ch via SSH to the remoteclienthost.ee.ethz.ch.
VNC through SSH tunnel with putty under Windows
Putty is the most popular free ssh client software on Windows. When you have configured a normal ssh session to the target machine you can configure additional features like tunnels and and remote command.Here are the steps to get running this solution:
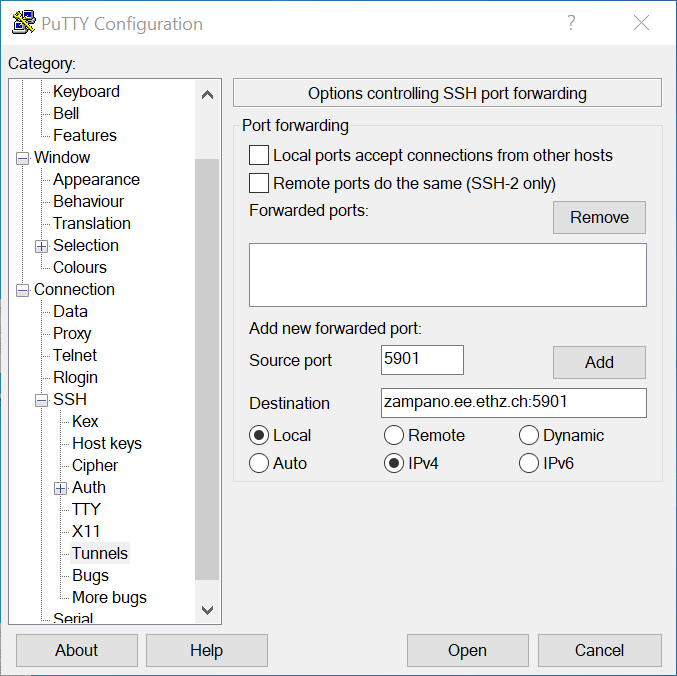
- Create a putty session to the server login.ee.ethz.ch and configure an additional tunnel in this session with port forwarding to your personal client. The following screeshots show how to configure an additional tunnel for connecting the local port 5901 to the vncserver port on your client in the ETH network:

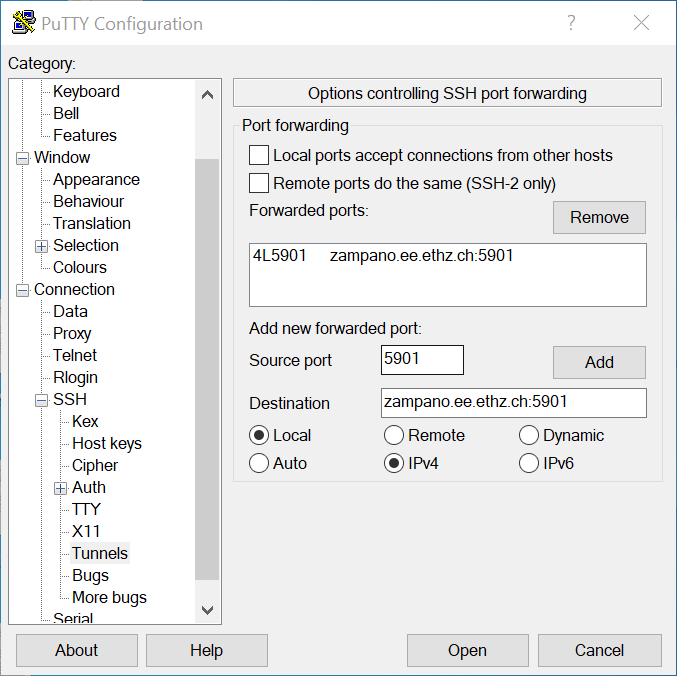
After clicking the "Add"-Button the putty window changes to:

Don't forget to save the session if you want this tunnel to be permanently configured in this session.
- If you open this session now you get a terminal window on mira, the actual login server. If you haven't already running the vncserver on your client you can start the server over a ssh remote command with:
fgtest01@mira:~$ ssh <hostname> '/usr/bin_override/vncserver :1'
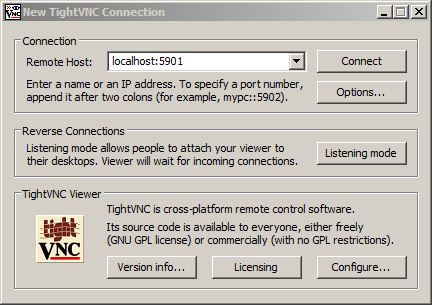
- Now you can connect your vnc viewer programm to the configured listening port 5901 of the ssh tunnel on localhost:
VNC through SSH tunnel with OpenSSH on Windows 10
Windows 10 has an optional installable feature ( Apps -> Optional features -> OpenSSH Client ). With OpenSSH client installed you can connect the vncviewer as described in the linux tunnel section above.
