|
Size: 3887
Comment:
|
← Revision 42 as of 2020-09-22 20:41:37 ⇥
Size: 2751
Comment:
|
| Deletions are marked like this. | Additions are marked like this. |
| Line 1: | Line 1: |
| #rev 2020-09-22 davidsch |
|
| Line 5: | Line 7: |
| If your client was updated from Debian Squeeze (6.0) to Debian Wheezy (7) and all your KOrganizer events disappeared after the migration, or if you are a new KOrganizer user and you cannot get KOrganizer to work (e.g. KOrganizer notifies you about being unable to store a new event or about being unable to read the calendar file), you should read the following instructions. | If all your KOrganizer events disappeared when starting KOrganizer on a newer Linux release, or if you are a new KOrganizer user and you cannot get KOrganizer to work (e.g. KOrganizer notifies you about being unable to store a new event or about being unable to read the calendar file), you should read the following instructions. |
| Line 8: | Line 10: |
| 1. Make sure, KOrganizer and its components are not running. After you closed KOrganizer, kill all dangling processes like ''korganizer'' and ''korgac'': {{{ | 1. Make sure, KOrganizer and its components are not running. After you closed KOrganizer, kill all dangling processes like ''korganizer'' and ''korgac'': {{{ |
| Line 11: | Line 14: |
| 1. If you alredy used KOrganizer, move your calendar file, e.g. {{{ mv $HOME/.kde/share/apps/korganizer/std.ics $HOME/.kde/share/apps/korganizer/old.ics |
1. Run {{{ /usr/bin/akonadiconsole }}}, The screen looks as follows: {{attachment:akonadiconsole.jpg}} 1. In the menu, head to "Server", and choose "Stop server". Leave the akonadiconsole dialog open. 1. If you alredy used KOrganizer, move your calendar file, e.g. {{{ mv $HOME/.local/share/apps/korganizer/std.ics $HOME/.local/share/apps/korganizer/old.ics |
| Line 14: | Line 21: |
| 1. Cleanup your KDE profile. CAUTION: backup all files to be removed, as you might loose application settings and -data if you were already using KDE applications before. You might skip this step and try to start with the next step, it might work too. If it doesn't, you should try the cleanup: {{{ | 1. Cleanup your KDE profile. CAUTION: backup all files to be removed, as you might loose application settings and -data if you were already using KDE applications before. You might skip this step and try to start with the next step, it might work too. If it doesn't, you should try the cleanup: {{{ |
| Line 16: | Line 24: |
| rm -rf $HOME/.kde/share/config/akonadi* rm -rf $HOME/.kde/share/config/kresources |
|
| Line 19: | Line 25: |
| rm -rf $HOME/.config/akonadi | |
| Line 21: | Line 26: |
| 1. Run {{{ /usr/bin/akonadiconsole }}}, The screen looks as follows: 1. {{attachment:akonadiconsole.jpg}} 1. If there is not yet an item in the list called "Personal Calendar", click the button ''[Add...]'', the following box appears: 1. {{attachment:akonadiconsole-add.jpg}} 1. Choose ''Akonadi''. Do not choose ''Calendar in local directory''! 1. The following dialog appears: 1. {{attachment:ko3.jpg}} 1. Click on the listfield entry ''Personal Calendar'' and make sure, the checkboxes [x] Events, [x] Todos and [x] Journals are set. 1. If you want to store your calendar data file in a different directory than the default path, click the ''[Manage Calendar Sources]'' button. In this case the dialog below shows up: 1. {{attachment:ko4.jpg}} 1. Choose ''[Modify...]'', which will open this window: 1. {{attachment:ko5.jpg}} 1. Here, you can set another path for your calendar database file (std.ics by default). 1. Go back to the main dialog shown below, select your calendar resource created and make it the default by clicking on the button ''[Use as Standard]'': 1. {{attachment:ko6.jpg}} 1. Finally, click the ''[Apply]'' button and close the window. 1. Start the akonadi service: {{{ /usr/bin/akonadictl start }}} 1. Now it's time to start KOrganizer. If you want to begin with a new blank calendar, you are finished. If you need to import your old calendar data from previous versions of KOrganizer, follow the next steps: 1. In KOrganizer, go to the ''File'' menu, choose ''Import'', then ''Import Calendar...'', pick your old calendar file, e.g. ''old.ics''. Then KOrganizer asks you what to do with this file: 1. {{attachment:ko7.jpg}} 1. Choose ''Merge into existing calendar''. Please be patient. Depending on the amount of calendar entries you have in your old calendar file, this might take several minutes to complete and you won't see a progress bar (i.e. KOrganizer makes the impression of being frozen). 1. Now you should have (and see) all your imported calendar entries in the default (akonadi) calendar, that should also appear after you restarted KOrganizer: 1. {{attachment:ko8.jpg}} 1. If you are missing some panel on KOrganizer's right hand side (e.g. the panel where you can choose the calendars to be shown, if you have multiple calendars for instance), the reason is that this panel is hidden. To unhide it, click the three dots (...) that are found under the bottom most pane and drag the above pane upwards; then it should look like as follows: 1. {{attachment:ko9.jpg}} |
1. Back in the akonadiconsole, head to the menu "Server", and choose "Start server". Then open the tab "Agents" in the akonadiconsole dialog. 1. If there is not yet an item in the list called "Personal Calendar", click the button ''[Add...]'', the following box appears (if the "Personal Calendar" entry is already there skip this step). . {{attachment:akonadiconsole-add.jpg}} 1. Choose 'Ical Calendar File'. Do not choose ''ICal Calendar Folder''! 1. Now the "Personal Calendar" item should appear in the list of the first dialog (Tab "Agents" in the "Akonadi Console" main dialog). 1. To edit the calendar's settings, mark the "Personal Calendar" item in the list and click the "Configure..." button at the bottom of the dialog. The following window will appear: . {{attachment:personalcal.jpg}} 1. Edit the path so it points to the location where you put your current std.ics file (please make a backup of std.ics before you set the path to that file here - sometimes it happens that the file is truncated...) 1. Now it's time to start KOrganizer. Usually, the new "Personal Calendar" resource won't appear, because it is not selected to be shown. . {{attachment:korganizer.jpg}} 1. Thus, you must initially enable the "Personal Calendar" by means of the checkbox in the bottom-left corner of the window. |
KOrganizer Data Migration
Problem description
If all your KOrganizer events disappeared when starting KOrganizer on a newer Linux release, or if you are a new KOrganizer user and you cannot get KOrganizer to work (e.g. KOrganizer notifies you about being unable to store a new event or about being unable to read the calendar file), you should read the following instructions.
Steps to a working KOrganizer
Make sure, KOrganizer and its components are not running. After you closed KOrganizer, kill all dangling processes like korganizer and korgac:
pkill korg
Run /usr/bin/akonadiconsole , The screen looks as follows:
- In the menu, head to "Server", and choose "Stop server". Leave the akonadiconsole dialog open.
- If you alredy used KOrganizer, move your calendar file, e.g.
mv $HOME/.local/share/apps/korganizer/std.ics $HOME/.local/share/apps/korganizer/old.ics
- Cleanup your KDE profile. CAUTION: backup all files to be removed, as you might loose application settings and -data if you were already using KDE applications before. You might skip this step and try to start with the next step, it might work too. If it doesn't, you should try the cleanup:
 /usr/bin/akonadictl stop
 rm -rf $HOME/.local/share/akonadi
- Back in the akonadiconsole, head to the menu "Server", and choose "Start server". Then open the tab "Agents" in the akonadiconsole dialog.
If there is not yet an item in the list called "Personal Calendar", click the button [Add...], the following box appears (if the "Personal Calendar" entry is already there skip this step).
Choose 'Ical Calendar File'. Do not choose ICal Calendar Folder!
- Now the "Personal Calendar" item should appear in the list of the first dialog (Tab "Agents" in the "Akonadi Console" main dialog).
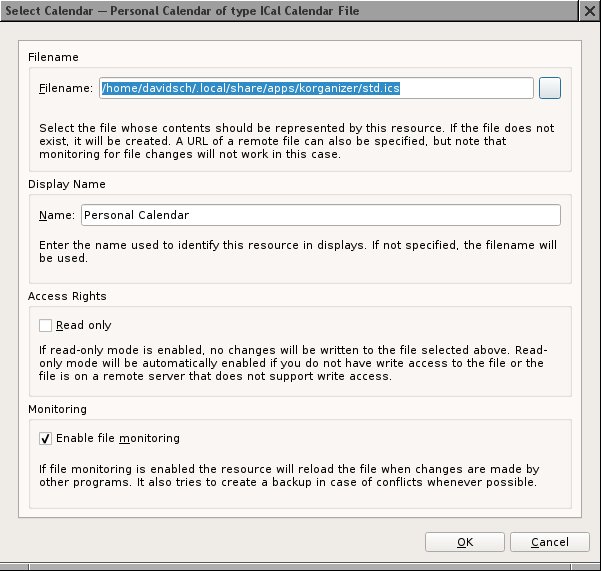
- To edit the calendar's settings, mark the "Personal Calendar" item in the list and click the "Configure..." button at the bottom of the dialog. The following window will appear:
- Edit the path so it points to the location where you put your current std.ics file (please make a backup of std.ics before you set the path to that file here - sometimes it happens that the file is truncated...)
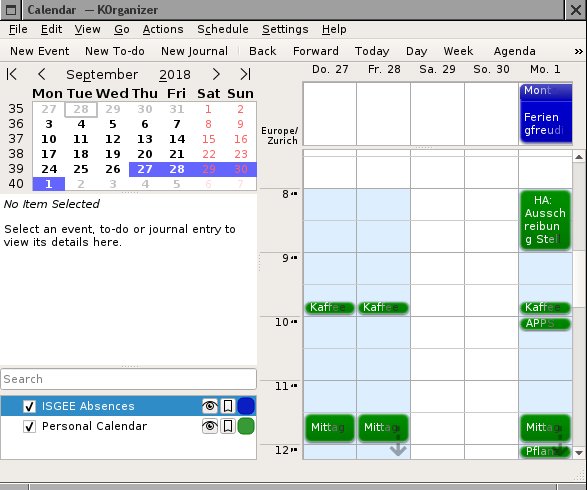
- Now it's time to start KOrganizer. Usually, the new "Personal Calendar" resource won't appear, because it is not selected to be shown.
- Thus, you must initially enable the "Personal Calendar" by means of the checkbox in the bottom-left corner of the window.

