|
Size: 2972
Comment:
|
Size: 2749
Comment:
|
| Deletions are marked like this. | Additions are marked like this. |
| Line 1: | Line 1: |
| #rev 2020-09-09 maegger |
|
| Line 2: | Line 4: |
| My D-ITET Account runs out of quota, but I have no data stored at all. What is the space eater? | I use Thunderbird and my D-ITET Account runs out of quota, but I have no data stored at all. What is the space eater? |
| Line 10: | Line 12: |
| /!\ The following steps have to be done for every Mail account configured in Thunderbird. | /!\ '''Attention''' The following steps have to be done for every Mail account configured in Thunderbird. /!\ |
| Line 12: | Line 14: |
| * Open Thunderbird and select on the left-side column the account. * Right click on it and choose settings. * Choose '''{{{Synchronization & Storage}}}''' on the left-side column underneath the account. {{attachment:tboff1.png}} * Uncheck the option '''{{{Keep messages for this account on this computer}}}''' * Click button 'Advanced', uncheck all checkboxes and click ok. {{attachment:thunderbirdSync02.jpg}} * Select option '''{{{Synchronize the most recent 1 days}}}''' {{attachment:thunderbirdSync01.jpg}} * Click the '''{{{OK}}}''' button. * Close Thunderbird if this was the last account otherwise start over with step 1 for the next account. |
1. Open Thunderbird and select on the left-side column the desired account (e.g. in this example {{{maegger@ee.ethz.ch}}}). 1. Right click on it and choose settings. 1. Choose '''{{{Synchronization & Storage}}}''' on the left-side column underneath the account ('''Point 1''' in Screenshot). {{attachment:syncstorage.png}} 1. '''Uncheck''' the option '''{{{Keep messages for this account on this computer}}}''' ('''Point 2''' in the above Screenshot) 1. Click the button '''{{{Advanced}}}''' in the same Window. ('''Point 3''' in the above Screenshot) 1. A new pop-up Window will appear, showing all available folder for all accounts. There, uncheck all checkboxes and click ok. {{attachment:uncheckfolders.png}} 1. Back in the original Window (note the unseleced ''Keep messages for this account'' setting) configure the option '''{{{Synchronize the most recent}}}''' to '''{{{1 Days}}}''' {{attachment:sync1day.png}} 1. Click the '''{{{OK}}}''' button. 1. Close Thunderbird if this was the last account otherwise start over with step 1 for the next account. |
| Line 27: | Line 30: |
| * Start Thunderbird once to make sure the settings take effect. Then close Thunderbird afterwards. First remove your local 'ImapMail' folder: * Click on Start -> Computer * Change to '''{{{C:\Users\<YOUR USERNAME>\AppData\Roaming\Thunderbird\Profiles\<RANDOM NAME>.default\}}}''' and delete the folder 'ImapMail'. After that remove the 'ImapMail' folder in your windows profile. * First you have to set the option "show hidden files" via control panel) * Change to '''homes(\\homes7.ee.ethz.ch)(H:)\.win7_prof.V2\AppData\Roaming\Thunderbird\Profiles\<RANDOM NAME>.default\''' and delete the folder 'ImapMail'. Now restart thunderbird |
1. Close Thunderbird 1. Remove your local {{{ImapMail}}} folder: * Click on Start -> Computer * Change to '''{{{C:\Users\<YOUR USERNAME>\AppData\Roaming\Thunderbird\Profiles\<RANDOM NAME>.default\}}}''' and delete the folder '''!ImapMail'''. 1. Restart thunderbird (the '''!ImapMail''' folder will be created again, but with less data) |
| Line 42: | Line 37: |
| 1. Start Thunderbird once to make sure the settings take effect. Then close Thunderbird afterwards. 1. In case something goes wrong we do not delete the synchronisation files but move them to '''{{{/scratch}}}'''. * Open a Terminal * Change to the Synchronisation directory. |
1. Close Thunderbird 1. Open a Terminal and change to the Synchronisation directory. |
| Line 47: | Line 40: |
| cd ~/.thunderbird/<RANDOM NAME>.default/ImapMail }}} * Now move any directory and its corresponding *.msf file to '''{{{/scratch}}}'''. |
cd ~/.thunderbird/<RANDOM NAME>.default/ }}} 1. Remove the ImapMail folder |
| Line 51: | Line 44: |
| # example to move all D-ITET and NETHZ Accounts mv imap* mail* /scratch }}} |
$ rm -rf ImapMail }}} |
| Line 55: | Line 47: |
| Now start thunderbird again. If in any case you miss some data (which should not happen!) just close Thunderbird, move all files from scratch back to its origin and restart thunderbird. | 1. Restart thunderbird (the 'ImapMail' folder will be created again, but with less data) |
Problem
I use Thunderbird and my D-ITET Account runs out of quota, but I have no data stored at all. What is the space eater?
Solution
You have probably activated the synchronisation in Thunderbird. This Feature creates a local copy of every mail in your imap account. This feature can be used, when working with a self managed laptop which is not always online. In this offline mode you will access the emails through this offline stored data.
In most cases you do not need this files, so you should delete them and free up your disk space.
Thunderbird Settings
![]() Attention The following steps have to be done for every Mail account configured in Thunderbird.
Attention The following steps have to be done for every Mail account configured in Thunderbird. ![]()
Open Thunderbird and select on the left-side column the desired account (e.g. in this example maegger@ee.ethz.ch).
- Right click on it and choose settings.
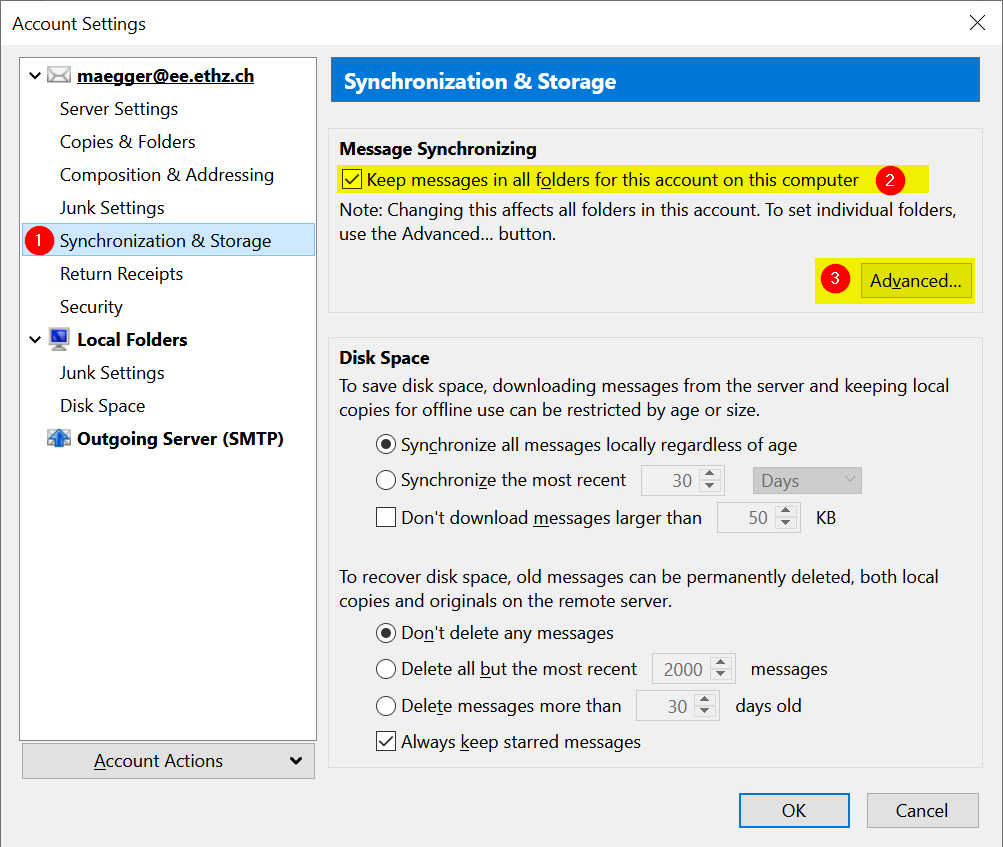
Choose Synchronization & Storage on the left-side column underneath the account (Point 1 in Screenshot).

Uncheck the option Keep messages for this account on this computer (Point 2 in the above Screenshot)
Click the button Advanced in the same Window. (Point 3 in the above Screenshot)
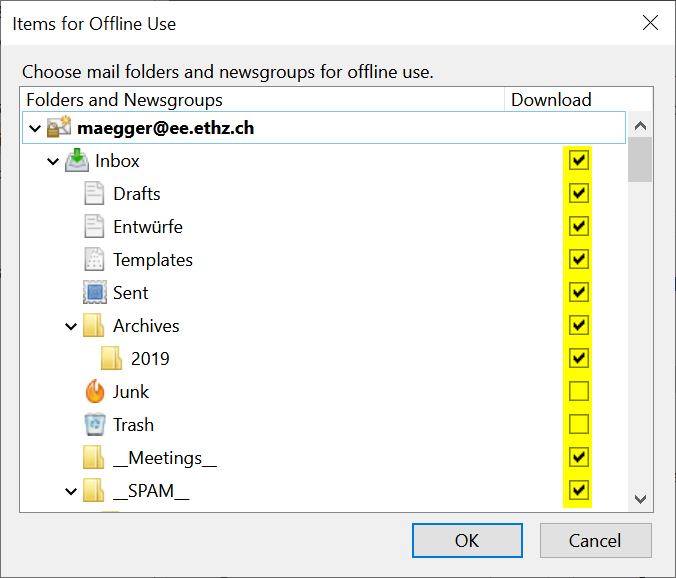
- A new pop-up Window will appear, showing all available folder for all accounts. There, uncheck all checkboxes and click ok.

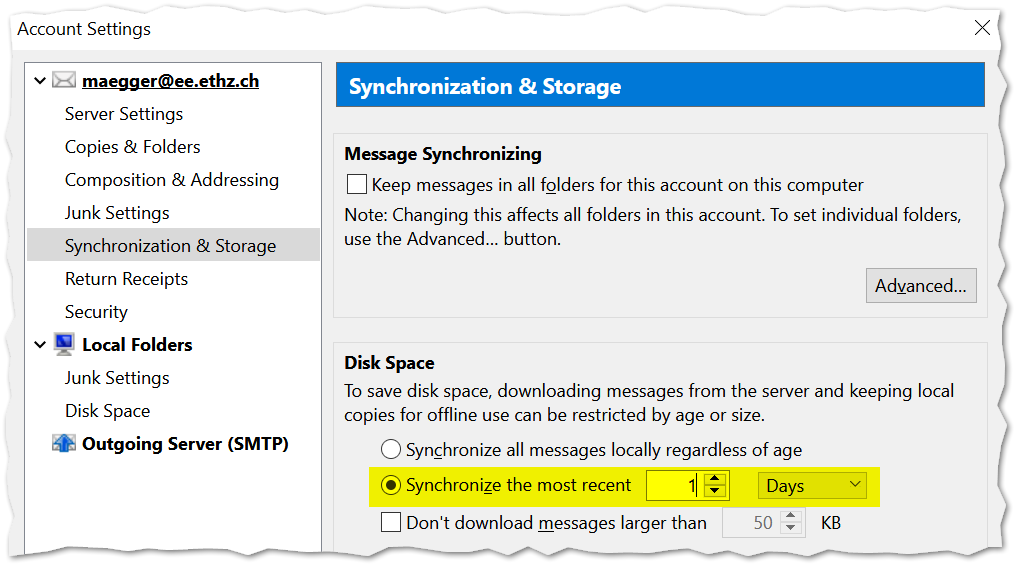
Back in the original Window (note the unseleced Keep messages for this account setting) configure the option Synchronize the most recent to 1 Days

Click the OK button.
- Close Thunderbird if this was the last account otherwise start over with step 1 for the next account.
Continue with the description for your operating system to finalize the configuration.
Removing sychronized mails in Windows
- Close Thunderbird
Remove your local ImapMail folder:
Click on Start -> Computer
Change to C:\Users\<YOUR USERNAME>\AppData\Roaming\Thunderbird\Profiles\<RANDOM NAME>.default\ and delete the folder ImapMail.
Restart thunderbird (the ImapMail folder will be created again, but with less data)
Removing sychronized mails in Linux
- Close Thunderbird
- Open a Terminal and change to the Synchronisation directory.
cd ~/.thunderbird/<RANDOM NAME>.default/
Remove the ImapMail folder
$ rm -rf ImapMail
Restart thunderbird (the 'ImapMail' folder will be created again, but with less data)