|
Size: 2012
Comment:
|
Size: 6948
Comment:
|
| Deletions are marked like this. | Additions are marked like this. |
| Line 1: | Line 1: |
| #rev 2018-11-21 maegger | |
| Line 2: | Line 3: |
| = Configuration of Outlook 2010 = 1. Start Outlook. The '''Startup Wizard''' will appear if you did not yet setup your mail account. Otherwise, you can start it by choosing Email-Accounts in the Tools Menu and then Add a new e-mail account |
<<TableOfContents(4)>> |
| Line 5: | Line 5: |
| 1. Go to the Files Tab. Choose to configure a new account and click '''Next'''. . {{attachment:outlook2010-01.png}} |
= Configuration of Outlook 2013/2016 = Outlook 2013 and Outlook 2016 are very similar and differ only in small parts. Therefore you can use these instructions on both clients. <<BR>><<BR>> The configuration below is divided into four sections, because the steps differ a little bit if you start from scratch or if you already used outlook before. * If you never used and configured Outlook before, then you should * start with the '''[[#ConfFromScratch|Configuration from scratch]]''' section and then * continue with the '''[[#ConfCommon|Common configuration part]]'''. * If you still have configured outlook before and want to add an additional account, then * start with the section '''[[#ConfAddAcc|Configuring an additional account]]''' and then * continue with the '''[[#ConfCommon|Common configuration part]]'''. |
| Line 8: | Line 16: |
| 1. Choose to configure the account manually and click '''Next'''. . {{attachment:outlook2010-02.png}} |
<<Anchor(ConfFromScratch)>> == Configuration from scratch == 1. Start outlook . {{attachment:outlook_001.png}} |
| Line 11: | Line 21: |
| 1. Choose Internet-E-Mail (IMAP) and click '''Add Account'''. . {{attachment:outlook2010-03.png}} |
1. The '''Outlook startup wizard''' will appear. Click '''__N__ext >''' to start with the configuration. . {{attachment:outlook_002.png}} |
| Line 14: | Line 24: |
| 1. Fill in you personal Information and select: * E-mail Address: if you have an alias, put it here (e.g. " john.doe@ee.ethz.ch ") |
1. Tell outlook to connect to an email account. Select '''(X) __Y__es''' ^(1)^ then click the '''__N__ext >''' ^(2)^ Button. . {{attachment:outlook_003.png}} |
| Line 17: | Line 27: |
| * Incoming server (IMAP): '''imap.ee.ethz.ch''' | 1. In the next window choose '''__M__anual setup or additional server types''' ^(1)^ and then click the '''__N__ext >''' ^(2)^ Button. . {{attachment:outlook_004.png}} |
| Line 19: | Line 30: |
| * Outgoing mail server (SMTP): '''smtp.ee.ethz.ch''' | 1. You can now continue with the steps described in the Section: '''[[#ConfCommon|Common configuration part]]''' |
| Line 21: | Line 32: |
| * User Name: your username | <<Anchor(ConfAddAcc)>> == Configuring an additional account == 1. Start outlook . {{attachment:outlook_001.png}} |
| Line 23: | Line 37: |
| * Password: only if you do not want to enter it everytime (Mark the checkbox '''save password''') {{attachment:outlook2010-04.png}} Click '''More Settings ...'''. |
1. Select the '''Files''' tab, then select '''Info''' ^(1)^ and then click at the '''+ Add Account''' ^(2)^ Button. . {{attachment:outlook_100.png}} |
| Line 27: | Line 40: |
| 1. Rename the Account Name to reflect the email address it refers to . {{attachment:outlook2010-05.png}} Choose the '''Outgoing Server''' tab. |
1. In the next window choose '''__M__anual setup or additional server types''' ^(1)^ and then click the '''__N__ext >''' ^(2)^ Button. . {{attachment:outlook_101.png}} |
| Line 31: | Line 43: |
| 1. Mark the '''my server requires authentication''' checkbox and choose '''Use same settings''' . {{attachment:outlook2010-06.png}} Choose the '''Advanced''' tab. |
1. You can now continue with the steps described in the Section: '''[[#ConfCommon|Common configuration part]]''' |
| Line 35: | Line 45: |
| 1. Mark both '''SSL''' checkboxes and enter '''465''' for the Outgoing server (SMTP). Click '''OK''' and then '''Next'''. . {{attachment:outlook2010-07.png}} |
<<Anchor(ConfCommon)>> == Common configuration part == 1. configure your '''IMAP''' acocunt by selecting '''__P__OP or IMAP''' ^(1)^. Then click the '''__N__ext >''' ^(2)^ Button. . {{attachment:outlook_005.png}} |
| Line 38: | Line 50: |
| 1. End the wizard by clicking on '''Finish'''. . {{attachment:outlook2010-08.png}} |
1. Configure your IMAP and SMTP account as described below, then click the '''__M__ore Settings ...''' ^(9)^ Button. || '''Pos.''' || '''Name''' || '''Content''' || || 1 || Your Name: || Enter your First and Lastname. e.g. '''Peter Muster''' || || 2 || Email Address: || Enter your Mail address in the format '''{{{accountname@ee.ethz.ch}}}''' (e.g. ''pmuster@ee.ethz.ch'') || || 3 || Account Type: || Select '''IMAP''' as Account Type || || 4 || Incoming mail server: || '''imap.ee.ethz.ch''' || || 5 || Outgoing mail server (SMTP): || '''smtp.ee.ethz.ch''' || || 6 || User Name: || accountname (e.g. ''pmuster'') || || 7 || Password: || Your NETHZ Password for the given accountname || || 8 || Remember password || Select '''`[X]`''' the Box! || . {{attachment:outlook_006.png}} |
| Line 41: | Line 62: |
| 1. If you want to be sure to see all your folders, right-click on the account name in the folder pane and select '''IMAP Folders'''. . {{attachment:outlook2010-09.png}} |
1. In the '''General Tab''': Rename the account name to distinguish it against others. In the Example below we use '''ITET Account''' but you can choose whatever you like (or even leave the default email address). . {{attachment:outlook_007a.png}} |
| Line 44: | Line 65: |
| 1. Unmark the checkbox "show only subscribed folders". Click '''OK'''. . {{attachment:outlook2010-10.png}} |
1. In the '''Outgoing Server Tab''': Select '''`[X]` My outgoing server (SMTP) requires authentication''' and then make sure you have also set '''`(X)` Use same settings as my incoming mail server''' . {{attachment:outlook_007b.png}} |
| Line 47: | Line 68: |
| 1. Now your account should be ready to go! | 1. Configure the Fields ^(1-4)^in the order described (otherwise you have to re-enter some settings again). /!\ Make absolutely sure you have set '''INBOX''' as the '''root __f__older path''' ^(5)^. Then click the '''OK''' Button. . {{attachment:outlook_007c.png}} 1. Two Window (one for SMTP, one for IMAP) will appear. Make sure to enter your username and password and then make sure to select '''__S__ave this password in your password list.''' ^(1)^ if you do not want to re-enter your password every time. Then click the '''OK''' Button ^(2)^ . {{attachment:outlook_009.png}} 1. Outlook will now test your settings. Wait until you see two green checkmarks ^(1)^. If there are some errors, re-check the settings (typos!). Then click '''Close''' ^(2)^ . {{attachment:outlook_010.png}} 1. Click the '''Finish''' Button and you are almost done. Outlook should now start (if not, start it again manually). . {{attachment:outlook_011.png}} 1. If you want to see all folders in your mailaccount select the '''Inbox''' ^(1)^ of your mailaccount, do a '''right click''' on it and finally select '''I__M__AP Folders ...'''. . {{attachment:outlook_012.png}} 1. '''Unselect''' ^(1)^ the checkbox '''When displaying hierarchy in Outlook, show only subscribed folders.''' then click '''OK''' ^(2)^ to finalize the configuration. . {{attachment:outlook_013.png}} <<Anchor(ResetProfile)>> == Reset your Outlook profile == 1. Close Outlook, if open. 1. Go to C:\Users\'''%username%'''\!AppData\Local\Microsoft. The simplest way is to copy the path into the address bar of the explorer. . {{attachment:2_profile-reset_localappdata.PNG}} 1. Rename the directory '''Outlook''' to '''Outlook.bkp''' 1. Open the '''Control Panel''' (Systemsteuerung). Just enter '''control panel''' in the start menu. 1. Open the '''Mail''' settings. . {{attachment:5_profile-reset_open-mail.PNG}} 1. Click on the button '''E-mail Accounts...'''. . {{attachment:6_profile-reset_open-email-accounts.PNG}} 1. Remove all E-mail accounts. Select an account in the list and then click on '''Remove'''. . {{attachment:7_profile-reset_remove_accounts.PNG}} 1. Add your ITET E-mail account. Click on '''New...'''. . {{attachment:8_profile-reset_new.PNG}} 1. In the next window choose '''Manual setup or additional server types''' and then click the '''Next >''' button. . {{attachment:9_profile-reset_add-itet-account.PNG}} 1. You can now continue with the steps described here: '''[[#ConfCommon|Common configuration part]]''' 1. If you need calendars you have to add your Exchange E-mail account. Click on '''New...''' again. . {{attachment:11_profile-reset_new_ex.PNG}} 1. In the next window choose '''E-mail Account''', fill in the fields and then click the '''Next >''' button. /!\ As E-mail address you must fill in '''username@ethz.ch'''. . {{attachment:12_profile-reset_add-exchange-account.PNG}} 1. Just click on '''Finish'''. . {{attachment:13_profile-reset_finish.PNG}} 1. One last click on '''Ok'''. . {{attachment:14_profile-reset_info.PNG}} 1. Close the account settings. 1. Start Outlook. |
Contents
Configuration of Outlook 2013/2016
Outlook 2013 and Outlook 2016 are very similar and differ only in small parts. Therefore you can use these instructions on both clients.
The configuration below is divided into four sections, because the steps differ a little bit if you start from scratch or if you already used outlook before.
- If you never used and configured Outlook before, then you should
start with the Configuration from scratch section and then
continue with the Common configuration part.
- If you still have configured outlook before and want to add an additional account, then
start with the section Configuring an additional account and then
continue with the Common configuration part.
Configuration from scratch
- Start outlook
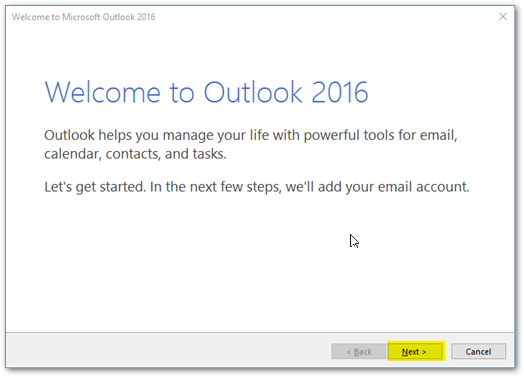
The Outlook startup wizard will appear. Click Next > to start with the configuration.
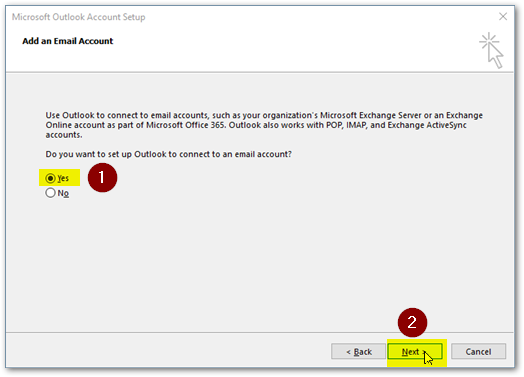
Tell outlook to connect to an email account. Select (X) Yes (1) then click the Next > (2) Button.
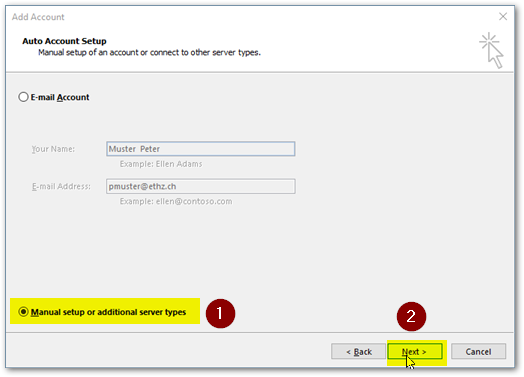
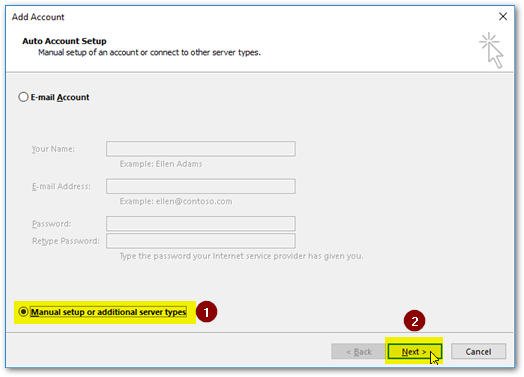
In the next window choose Manual setup or additional server types (1) and then click the Next > (2) Button.
You can now continue with the steps described in the Section: Common configuration part
Configuring an additional account
- Start outlook
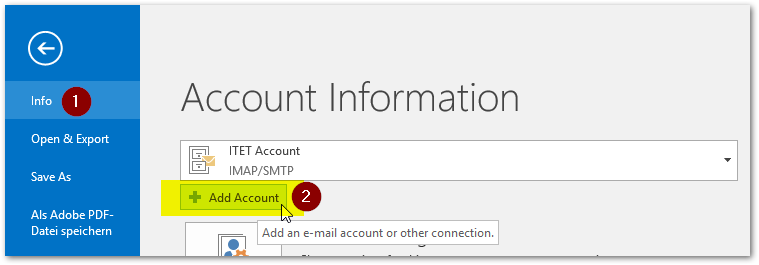
Select the Files tab, then select Info (1) and then click at the + Add Account (2) Button.
In the next window choose Manual setup or additional server types (1) and then click the Next > (2) Button.
You can now continue with the steps described in the Section: Common configuration part
Common configuration part
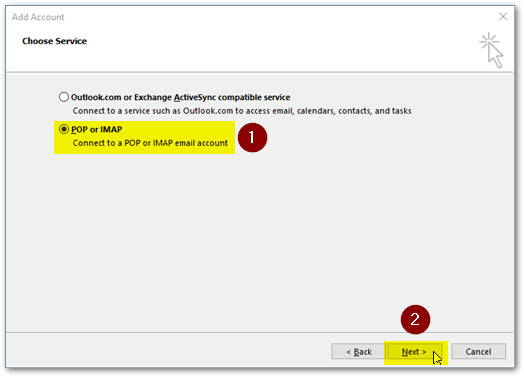
configure your IMAP acocunt by selecting POP or IMAP (1). Then click the Next > (2) Button.
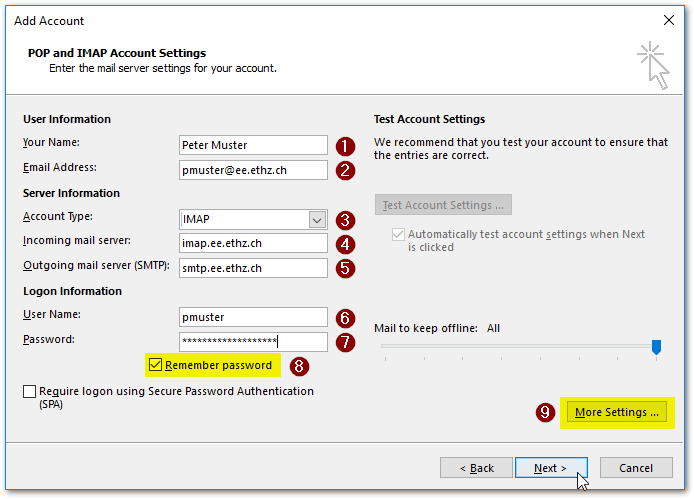
Configure your IMAP and SMTP account as described below, then click the More Settings ... (9) Button.
Pos.
Name
Content
1
Your Name:
Enter your First and Lastname. e.g. Peter Muster
2
Email Address:
Enter your Mail address in the format accountname@ee.ethz.ch (e.g. pmuster@ee.ethz.ch)
3
Account Type:
Select IMAP as Account Type
4
Incoming mail server:
imap.ee.ethz.ch
5
Outgoing mail server (SMTP):
smtp.ee.ethz.ch
6
User Name:
accountname (e.g. pmuster)
7
Password:
Your NETHZ Password for the given accountname
8
Remember password
Select [X] the Box!
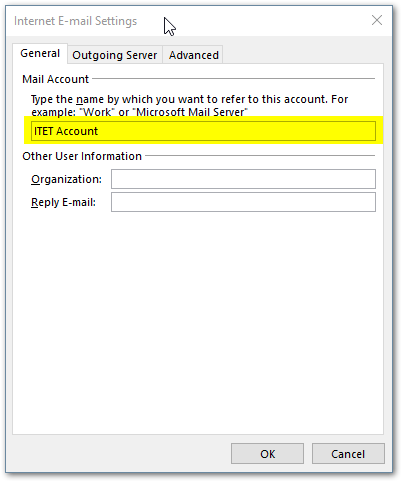
In the General Tab: Rename the account name to distinguish it against others. In the Example below we use ITET Account but you can choose whatever you like (or even leave the default email address).
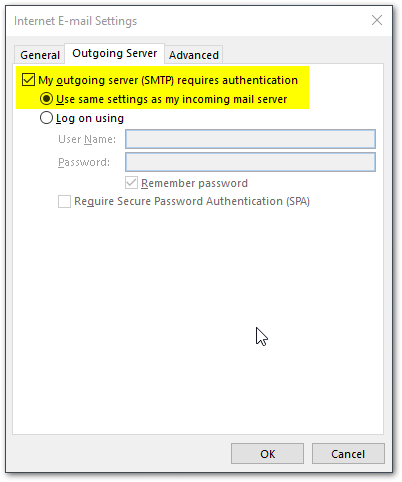
In the Outgoing Server Tab: Select [X] My outgoing server (SMTP) requires authentication and then make sure you have also set (X) Use same settings as my incoming mail server
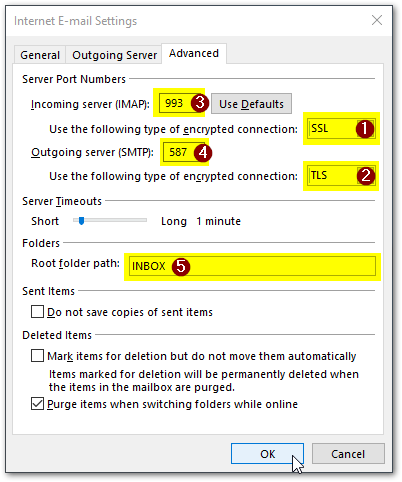
Configure the Fields (1-4)in the order described (otherwise you have to re-enter some settings again).
 Make absolutely sure you have set INBOX as the root folder path (5). Then click the OK Button.
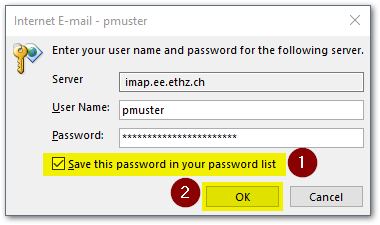
 Two Window (one for SMTP, one for IMAP) will appear. Make sure to enter your username and password and then make sure to select Save this password in your password list. (1) if you do not want to re-enter your password every time. Then click the OK Button (2)
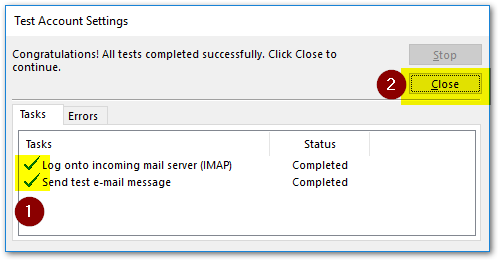
Outlook will now test your settings. Wait until you see two green checkmarks (1). If there are some errors, re-check the settings (typos!). Then click Close (2)
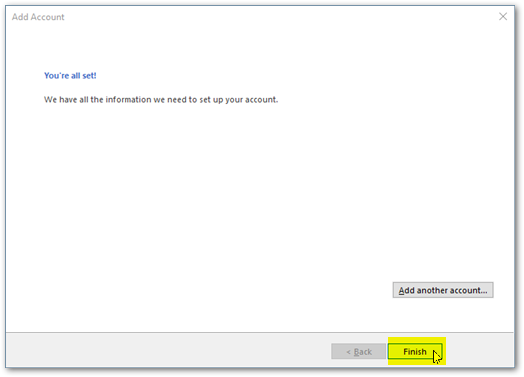
Click the Finish Button and you are almost done. Outlook should now start (if not, start it again manually).
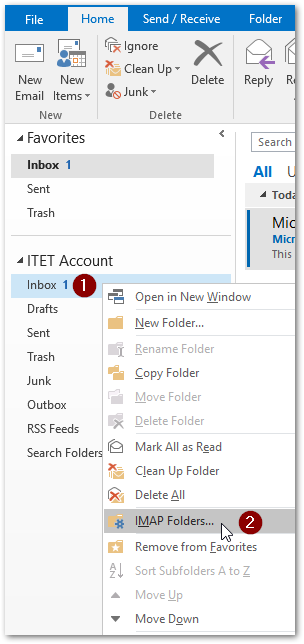
If you want to see all folders in your mailaccount select the Inbox (1) of your mailaccount, do a right click on it and finally select IMAP Folders ....
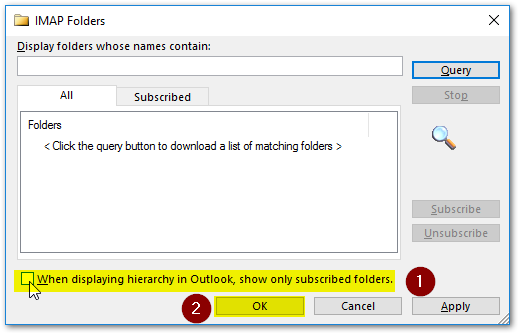
Unselect (1) the checkbox When displaying hierarchy in Outlook, show only subscribed folders. then click OK (2) to finalize the configuration.
Reset your Outlook profile
- Close Outlook, if open.
Go to C:\Users\%username%\AppData\Local\Microsoft. The simplest way is to copy the path into the address bar of the explorer.
Rename the directory Outlook to Outlook.bkp
Open the Control Panel (Systemsteuerung). Just enter control panel in the start menu.
Open the Mail settings.
Click on the button E-mail Accounts....
Remove all E-mail accounts. Select an account in the list and then click on Remove.
Add your ITET E-mail account. Click on New....
In the next window choose Manual setup or additional server types and then click the Next > button.
You can now continue with the steps described here: Common configuration part
If you need calendars you have to add your Exchange E-mail account. Click on New... again.
In the next window choose E-mail Account, fill in the fields and then click the Next > button.
 As E-mail address you must fill in username@ethz.ch.
 Just click on Finish.
One last click on Ok.
- Close the account settings.
- Start Outlook.

