Singularity Builder VM
Singularity Builder VM is an easy-to-install virtual machine running a mininmal Debian Linux installation prepared with Sylabs Singularity, allowing to build Apptainer/Singularity images as root user in a sandbox environment. The Builder VM is preconfigured to exchange data between predefined host and guest file systems. Singularity Builder VM must not be confused with the product Singularity Remote Builder, which is a part of the commercially available Sylabs Cloud services.
Click the following link if however you intend to learn more about concepts and usage of Apptainer/Singularity itself.
Supported systems
The Builder VM in its current concept may only be used on (managed) Linux computers. SingularityBuilder VM does only run on ISG D-ITET managed Linux computers which have been configured to run virtual machines. That is the case for all Tardis clients and some laboratory-owned clients. Older client hardware might not be supported. Contact ISG D-ITET <support@ee.ethz.ch> if you want to enable it on your managed client.
Default VM configuration
# Settings might be changed by the user

Maximum VM disk capacity:   30 GB
VM virtual CPU cores:        1 CPU
VM memory size:           6144 MB
Installation
You may use any of the ISG D-ITET managed computers mentioned above to perform the following steps:
- Open a Linux terminal
Enter sgbuilder. This will show you an overview/ help on how to install and start the Singularity Builder VM.
Create a new VM copy of the Singularity Builder VM in any directory you like, e.g. /scratch/<Your_Username>/<VM1>:
sgbuilder install default /scratch/Your_Username/VM1
Please note you should install your VM somewhere in /scratch and not in your user home directory for performance reasons.Once the VM has been installed, you can start it up as many times as you want using:
sgbuilder start /scratch/Your_Username/VM1
- To shut down the VM in a clean manner, enter "shutdown now" at the shell.
Usage
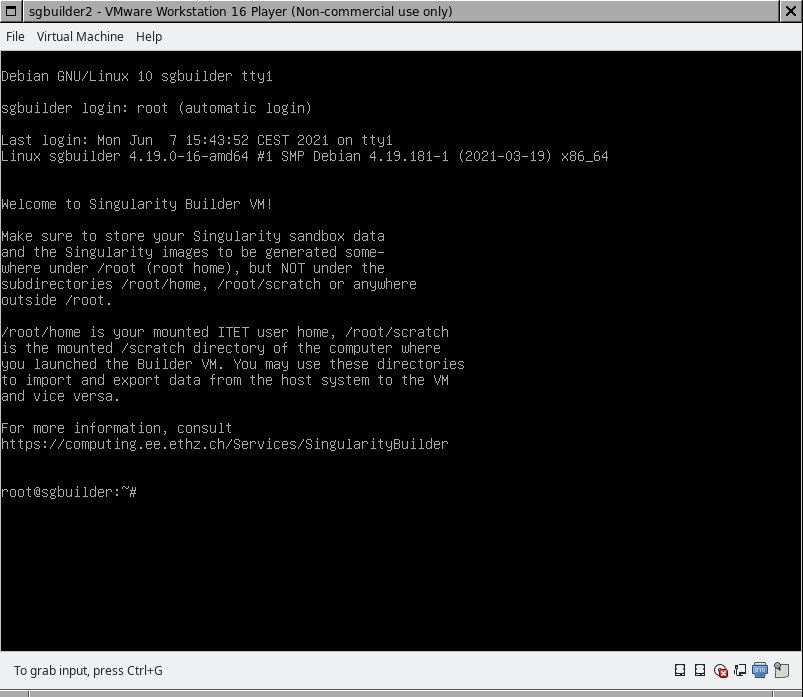
- Startup the Builder VM as described in the Installation section above. The following window appears after some startup seconds.
/root will be the current working directory right after VM startup. This is a 30 GB virtual disk within the VM that can be used to save newly generated Singularity images or a Singularity image sandbox.
/root/home is your ITET user home. This can be used to import or export data (e.g. generated SIF images) from the VM to your regular user home directory and vice versa.
/root/scratch is the /scratch directory of the Linux (host system) computer where you started up the VM using sgbuilder start. This can be used to import or export data from the VM to your computer's /scratch directory and vice versa.
When using Singularity, always ensure the output path (e.g the sandbox directory or Singularity image output location) is somewhere below /root. DO NOT ATTEMPT to save Singularity sandbox data or images directly to /root/home or /root/scratch or any other directory above /root (like the root user's home). Saving Singularity output data directly to the scratch or home won't work, as you cannot store any files there using other user id's or group id's than your own id's. Storing data above /root won't work because that would be on the VM's operating file system disk which has - intentionally - almost no diskspace left.
- That said, the idea is to use the VM as follows: first import all data needed from external filesystems into the VM's filesystem. Then do your Singularity image processing and at the end, export the generated Singularity image to an external filesystem.
Tips & tricks
VM usage notes (Do's and Don'ts)
Do not use the Singularity Builder VM to execute the generated Singularity (SIF) images. First of all, the VM's resources are quite limited, second, for GPU compute jobs, the VM has no direct hardware access to the host system's NVIDIA graphics card(s); thus CUDA and alike won't really work within the VM.
Recommended data storage locations
Singularity recipe files should be in your user home (e.g. in a git checkout). You can access the home in the VM using /root/home
Singularity image files (*.sif) should be stored on /scratch of the computer running SingularityBuilderVM. You can access the scratch directory in the VM using /root/scratch.
All files that belong to Singularity's sandbox must be stored within the VM somewhere under /root, but not under /root/home or /root/scratch.
Assigning more CPU's and memory to the VM
If you think the VM's performance is bad, you can assign more virtual CPU cores or memory to it. Please note CPU time and memory are limited resources of the host system. If you specify too many CPU's, not enough or too much memory, the VM might not start up or the the computer running the VM becomes noticeably slower. Changing the CPU count/ memory size should be done when the VM is powered off. Settings will come into effect after the VM is powered up again.
* Example: Change CPU count from 1 (default setting) to 4 virtual CPU's
sgbuilder setcpu 4 /scratch/Your_Username/VM1
* Example: Change VM memory size from 6144 MB (default setting) to 8192 MB
# Memory size must be specified in megabyte [MB] units

sgbuilder setmem 8192 /scratch/Your_Username/VM1
Changing the VM's keyboard settings
The default keyboard setting is "us" (american english keyboard). If you want to change this setting permanently (across reboots), you can edit
/etc/default/keyboard
within the VM and set another country code, e.g. "ch" for Swiss German keyboards. To make the change immediately effective without rebooting the VM, you can enter
setupcon <keymapcode>
e.g.
setupcon ch
Accessing the VM from outside
Sometimes you want to copy-paste text from your Linux desktop to the Singularity Builder VM console. You may have noticed however, that copy/ paste from/ to the VM console window does not work. As a workaround, you might access the VM's shell from outside the VM using the VM's ssh or serial console feature. We recommend using ssh, because ssh clients support higher-level terminal emulation, which is often not the case with standard tools for serial console access.
Accessing the VM through ssh
To make this work, you will first have to set a password for the root user
root@sgbuilder:~# passwd
New password: .......
Retype new password: .......
passwd: password updated successfully
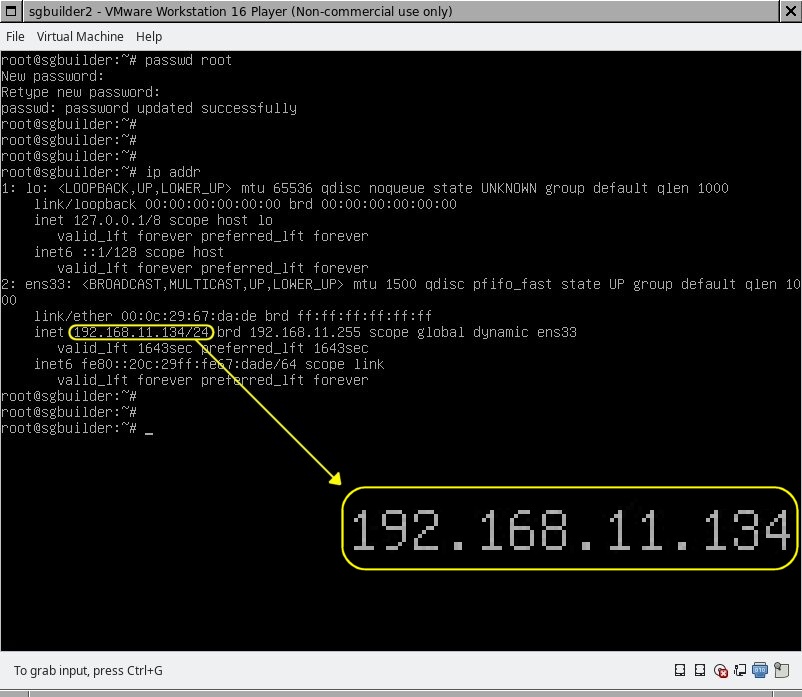
Then you have to find out the VM's current private IP address. This IP address might change across VM startups/ reboots and must therefore be looked up again after each VM restart. You will find the IP address as follows
root@sgbuilder:#~ ip addr
This will show you the ip addresses of all network interfaces. Have a look at the screenshot below to get an idea how to find the right IP address in the output. Usually there are only two interfaces, lo (loopback, not relevant), and the other interface, ens33 in the example, which will be the relevant interface. The relevant line begins with inet followed by the IP address. If that line is missing, if the IP adress contains only zeroes or is something else than 192.168.x.y or 10.0.x.y, then something might be wrong with the network configuration.

As soon as you know the IP address, 192.168.11.134 in our example, you can access the VM's shell from any terminal outside the VM using
ssh root@<vm_ip>

in our example, that would be:

ssh root@192.168.11.134
If you are askey any questions, answer them with yes.
- NOTE: You can access the VM using ssh only from the host where you started the VM, but not from other hosts, as the IP addresses used by the VM are private IP addresses which are not routed.
Accessing the VM through serial console
You can access the VM's console from any Linux terminal as follows (example):
socat - /scratch/Your_Username/VM1/sgbuilder.sock
NOTE: /scratch/Your_Username/VM1 is the path to your VM installation as described above in the "Installation" section
NOTE: Terminal emulation in serial console does not work very well. You might enter
stty -echo
to disable echoing your inputs twice on each line entered.
The VM cannot access the network, because it has no IP address
Usually, the IP address is automatically assigned during the VM startup. You may check this entering ip addr within the VM. The network interface used for external connections is ususally named ensNN, e.g. ens33. If it doesn't have a valid IPv4 address, you may either reboot the VM or try to obtain a new IP without rebooting, using dhclient <interfacename>. In our example, the <interfacename> would be ens33.
